2021-08-26 21:06:15 +02:00
|
|
|
|
# Etherguard
|
2021-08-30 08:24:46 +02:00
|
|
|
|
[English](README.md)
|
|
|
|
|
|
|
2021-08-26 21:06:15 +02:00
|
|
|
|
Super Mode的[範例配置檔](./)的說明文件
|
|
|
|
|
|
在了解Super Mode的運作之前,建議您先閱讀[Static Mode的運作](../static_mode/README_zh.md)方法,再閱讀本篇會比較好
|
|
|
|
|
|
|
|
|
|
|
|
## Super Mode
|
|
|
|
|
|
|
|
|
|
|
|
Super Mode是受到[n2n](https://github.com/ntop/n2n)的啟發
|
|
|
|
|
|
分為super node和edge node兩種節點
|
|
|
|
|
|
|
|
|
|
|
|
全部節點都會和supernode建立連線
|
|
|
|
|
|
藉由supernode交換其他節點的資訊,以及udp打洞
|
|
|
|
|
|
由supernode執行[Floyd-Warshall演算法](https://zh.wikipedia.org/zh-tw/Floyd-Warshall算法),並把計算結果分發給全部edge node
|
|
|
|
|
|
|
2021-09-30 23:15:23 +02:00
|
|
|
|
在edge node的super模式下,設定檔裡面的`nexthoptable`以及`peers`是無效的。
|
2021-09-23 13:31:01 +02:00
|
|
|
|
這些資訊都是從super node上面下載
|
2021-09-30 23:15:23 +02:00
|
|
|
|
同時,supernode會幫每個連線生成Preshared Key,分發給edge使用(如果`usepskforinteredge`有啟用的話)。
|
2021-09-23 13:31:01 +02:00
|
|
|
|
```golang
|
|
|
|
|
|
psk = shs256("PubkeyPeerA" + "PubkeyPeerB" + "主廚特調當季精選海鹽")[:32]
|
|
|
|
|
|
```
|
2021-08-26 21:06:15 +02:00
|
|
|
|
|
|
|
|
|
|
### SuperMsg
|
|
|
|
|
|
但是比起Static mode,Super mode引入了一種新的 `終點ID` 叫做 `SuperMsg`。
|
|
|
|
|
|
所有送往Super node的封包都會是這種類型。
|
|
|
|
|
|
這種封包不會在edge node之間傳播,收到也會不會轉給任何人,如同`終點ID == 自己`一般
|
|
|
|
|
|
|
2021-09-30 23:15:23 +02:00
|
|
|
|
## Control Message
|
|
|
|
|
|
從Super mode開始,我們有了Static mode不存在的Control Message。他會控制EtherGuard一些行為
|
|
|
|
|
|
在Super mode下,我們不會轉發任何控制消息。 我們只會直接接收或發送給目標。
|
|
|
|
|
|
下面列出Super Mode會出現的Control message
|
2021-08-26 21:06:15 +02:00
|
|
|
|
|
2021-09-30 23:15:23 +02:00
|
|
|
|
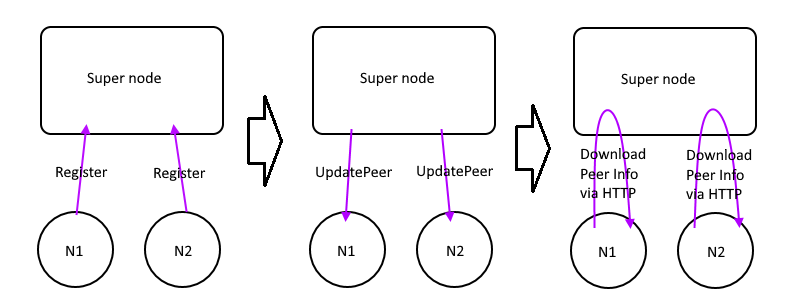
### Register
|
2021-08-26 21:06:15 +02:00
|
|
|
|
具體運作方式類似這張圖
|
2021-09-30 23:15:23 +02:00
|
|
|
|
|
|
|
|
|
|
1. edge node發送`Register`給super node
|
|
|
|
|
|
2. super node收到以後就知道這個edge的endpoint IP和埠號。
|
|
|
|
|
|
3. 更新進資料庫以後發布`UpdatePeerMsg`。
|
|
|
|
|
|
4. 其他edge node收到以後就用HTTP API去下載完整的peer list。並且把自己沒有的peer通通加到本地
|
2021-08-26 21:06:15 +02:00
|
|
|
|
|
|
|
|
|
|
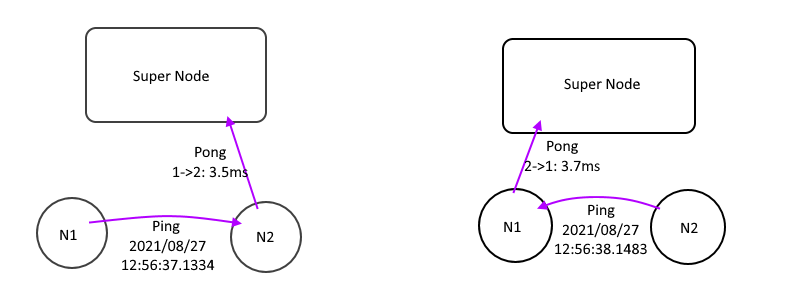
### Ping/Pong
|
|
|
|
|
|
有了peer list以後,接下來的運作方式類似這張圖
|
|
|
|
|
|
|
|
|
|
|
|
Edge node 會嘗試向其他所有peer發送`Ping`,裡面會攜帶節點自己的時間
|
|
|
|
|
|
`Ping` 封包的TTL=0 所以不會被轉發,只會抵達可以直連的節點
|
|
|
|
|
|
收到`Ping`,就會產生一個`Pong`,並攜帶時間差。這個時間就是單向延遲
|
|
|
|
|
|
但是他不會把`Pong`送回給原節點,而是送給Super node
|
|
|
|
|
|
|
2021-09-30 23:15:23 +02:00
|
|
|
|
### UpdateNhTable
|
2021-08-26 21:06:15 +02:00
|
|
|
|
Super node收到節點們傳來的Pong以後,就知道他們的單向延遲了。接下來的運作方式類似這張圖
|
|
|
|
|
|

|
|
|
|
|
|
Super node收到Pong以後,就會更新它裡面的`Distance matrix`,並且重新計算轉發表
|
|
|
|
|
|
如果有變動,就發布`UpdateNhTableMsg`
|
|
|
|
|
|
其他edge node收到以後就用HTTP API去下載完整的轉發表
|
|
|
|
|
|
|
2021-09-30 23:15:23 +02:00
|
|
|
|
### UpdateError
|
|
|
|
|
|
通知edges有錯誤發生,關閉egde端程式
|
|
|
|
|
|
發生在版本號不匹被,該edge的NodeID配置錯誤,還有該Edge被刪除時觸發
|
|
|
|
|
|
|
2021-08-26 21:06:15 +02:00
|
|
|
|
### HTTP API
|
|
|
|
|
|
為什麼要用HTTP額外下載呢?直接`UpdateXXX`夾帶資訊不好嗎?
|
|
|
|
|
|
因為udp是不可靠協議,能攜帶的內容量也有上限。
|
|
|
|
|
|
但是peer list包含了全部的peer資訊,長度不是固定的,可能超過
|
|
|
|
|
|
所以這樣設計,`UpdateXXX`單純只是告訴edge node有資訊更新,請速速用HTTP下載
|
|
|
|
|
|
|
|
|
|
|
|
而且`UpdateXXX`本身不可靠,說不定根本就沒抵達edge node。
|
|
|
|
|
|
所以`UpdateXXX`這類資訊都帶了`state hash`。用HTTP API的時候要帶上
|
|
|
|
|
|
這樣super node收到HTTP API看到`state hash`就知道這個edge node確實有收到`UpdateXXX`了。
|
|
|
|
|
|
不然每隔一段時間就會重新發送`UpdateXXX`給該節點
|
|
|
|
|
|
|
2021-09-30 23:15:23 +02:00
|
|
|
|
## HTTP Guest API
|
|
|
|
|
|
HTTP還有一些個API,給前端使用,幫助管理整個網路
|
|
|
|
|
|
|
2021-09-23 13:31:01 +02:00
|
|
|
|
### peerstate
|
2021-09-30 23:15:23 +02:00
|
|
|
|
首先是這個peerstate
|
|
|
|
|
|
```bash
|
|
|
|
|
|
curl "http://127.0.0.1:3000/api/peerstate?Password=passwd"
|
2021-09-23 13:31:01 +02:00
|
|
|
|
```
|
2021-08-26 21:06:15 +02:00
|
|
|
|
可以給前端看的,用來顯示現在各節點之間的單向延遲狀況
|
|
|
|
|
|
之後可以用來畫力導向圖。
|
|
|
|
|
|
|
2021-09-30 23:15:23 +02:00
|
|
|
|
這個json下載下來有一個叫做`infinity`的欄位,值應該永遠是9999
|
2021-08-26 21:06:15 +02:00
|
|
|
|
因為json沒辦法表達無限大。所以大於這個數值的就是無限大,不可達的意思
|
2021-09-29 02:23:59 +02:00
|
|
|
|
這個數值是編譯時決定的,一般不會動。但保留變更的彈性
|
2021-08-26 21:06:15 +02:00
|
|
|
|
所以有這個欄位,前端顯示時看到數值大於這個,就視為不可達,不用畫線了
|
|
|
|
|
|
|
2021-09-29 02:23:59 +02:00
|
|
|
|
返回值範例:
|
|
|
|
|
|
```json
|
|
|
|
|
|
{
|
|
|
|
|
|
"PeerInfo": {
|
|
|
|
|
|
"1": {
|
|
|
|
|
|
"Name": "hk",
|
|
|
|
|
|
"LastSeen": "2021-09-29 11:23:22.854700559 +0000 UTC m=+28740.116476977"
|
|
|
|
|
|
},
|
|
|
|
|
|
"1001": {
|
|
|
|
|
|
"Name": "relay_kr",
|
|
|
|
|
|
"LastSeen": "2021-09-29 11:23:21.277417897 +0000 UTC m=+28738.539194315"
|
|
|
|
|
|
},
|
|
|
|
|
|
"121": {
|
|
|
|
|
|
"Name": "za_north",
|
|
|
|
|
|
"LastSeen": "0001-01-01 00:00:00 +0000 UTC"
|
|
|
|
|
|
},
|
|
|
|
|
|
"33": {
|
|
|
|
|
|
"Name": "us_west",
|
|
|
|
|
|
"LastSeen": "2021-09-29 11:23:13.257033252 +0000 UTC m=+28730.518809670"
|
|
|
|
|
|
},
|
|
|
|
|
|
"49": {
|
|
|
|
|
|
"Name": "us_east",
|
|
|
|
|
|
"LastSeen": "2021-09-29 11:23:16.606165241 +0000 UTC m=+28733.867941659"
|
|
|
|
|
|
},
|
|
|
|
|
|
"51": {
|
|
|
|
|
|
"Name": "ca_central",
|
|
|
|
|
|
"LastSeen": "0001-01-01 00:00:00 +0000 UTC"
|
|
|
|
|
|
},
|
|
|
|
|
|
"65": {
|
|
|
|
|
|
"Name": "fr",
|
|
|
|
|
|
"LastSeen": "2021-09-29 11:23:19.4084596 +0000 UTC m=+28736.670236018"
|
|
|
|
|
|
},
|
|
|
|
|
|
"81": {
|
|
|
|
|
|
"Name": "au_central",
|
|
|
|
|
|
"LastSeen": "0001-01-01 00:00:00 +0000 UTC"
|
|
|
|
|
|
},
|
|
|
|
|
|
"89": {
|
|
|
|
|
|
"Name": "uae_north",
|
|
|
|
|
|
"LastSeen": "0001-01-01 00:00:00 +0000 UTC"
|
|
|
|
|
|
},
|
|
|
|
|
|
"9": {
|
|
|
|
|
|
"Name": "jp_east",
|
|
|
|
|
|
"LastSeen": "2021-09-29 11:23:16.669505147 +0000 UTC m=+28733.931281565"
|
|
|
|
|
|
},
|
|
|
|
|
|
"97": {
|
|
|
|
|
|
"Name": "br_south",
|
|
|
|
|
|
"LastSeen": "0001-01-01 00:00:00 +0000 UTC"
|
|
|
|
|
|
}
|
|
|
|
|
|
},
|
|
|
|
|
|
"Infinity": 99999,
|
|
|
|
|
|
"Edges": {
|
|
|
|
|
|
"1": {
|
|
|
|
|
|
"1001": 0.033121187,
|
|
|
|
|
|
"33": 0.075653164,
|
|
|
|
|
|
"49": 0.100471502,
|
|
|
|
|
|
"65": 0.065714769,
|
|
|
|
|
|
"9": 0.022864241
|
|
|
|
|
|
},
|
|
|
|
|
|
"1001": {
|
|
|
|
|
|
"1": 0.018561948,
|
|
|
|
|
|
"33": 0.064077348,
|
|
|
|
|
|
"49": 0.094459818,
|
|
|
|
|
|
"65": 0.079481599,
|
|
|
|
|
|
"9": 0.011163433
|
|
|
|
|
|
},
|
|
|
|
|
|
"33": {
|
|
|
|
|
|
"1": 0.075263428,
|
|
|
|
|
|
"1001": 0.070029457,
|
|
|
|
|
|
"49": 0.032631349,
|
|
|
|
|
|
"65": 0.045575061,
|
|
|
|
|
|
"9": 0.050444255
|
|
|
|
|
|
},
|
|
|
|
|
|
"49": {
|
|
|
|
|
|
"1": 0.100271358,
|
|
|
|
|
|
"1001": 0.100182834,
|
|
|
|
|
|
"33": 0.034563118,
|
|
|
|
|
|
"65": 0.017950046,
|
|
|
|
|
|
"9": 0.07510982
|
|
|
|
|
|
},
|
|
|
|
|
|
"65": {
|
|
|
|
|
|
"1": 0.114219741,
|
|
|
|
|
|
"1001": 0.132759205,
|
|
|
|
|
|
"33": 0.095265063,
|
|
|
|
|
|
"49": 0.067413235,
|
|
|
|
|
|
"9": 0.127562362
|
|
|
|
|
|
},
|
|
|
|
|
|
"9": {
|
|
|
|
|
|
"1": 0.026909699,
|
|
|
|
|
|
"1001": 0.022555855,
|
|
|
|
|
|
"33": 0.056469043,
|
|
|
|
|
|
"49": 0.090400723,
|
|
|
|
|
|
"65": 0.08525314
|
|
|
|
|
|
}
|
|
|
|
|
|
},
|
|
|
|
|
|
"NhTable": {
|
|
|
|
|
|
"1": {
|
|
|
|
|
|
"1001": 1001,
|
|
|
|
|
|
"33": 33,
|
|
|
|
|
|
"49": 49,
|
|
|
|
|
|
"65": 65,
|
|
|
|
|
|
"9": 9
|
|
|
|
|
|
},
|
|
|
|
|
|
"1001": {
|
|
|
|
|
|
"1": 1,
|
|
|
|
|
|
"33": 33,
|
|
|
|
|
|
"49": 49,
|
|
|
|
|
|
"65": 65,
|
|
|
|
|
|
"9": 9
|
|
|
|
|
|
},
|
|
|
|
|
|
"33": {
|
|
|
|
|
|
"1": 1,
|
|
|
|
|
|
"1001": 1001,
|
|
|
|
|
|
"49": 49,
|
|
|
|
|
|
"65": 65,
|
|
|
|
|
|
"9": 9
|
|
|
|
|
|
},
|
|
|
|
|
|
"49": {
|
|
|
|
|
|
"1": 1,
|
|
|
|
|
|
"1001": 9,
|
|
|
|
|
|
"33": 33,
|
|
|
|
|
|
"65": 65,
|
|
|
|
|
|
"9": 9
|
|
|
|
|
|
},
|
|
|
|
|
|
"65": {
|
|
|
|
|
|
"1": 1,
|
|
|
|
|
|
"1001": 1001,
|
|
|
|
|
|
"33": 33,
|
|
|
|
|
|
"49": 49,
|
|
|
|
|
|
"9": 9
|
|
|
|
|
|
},
|
|
|
|
|
|
"9": {
|
|
|
|
|
|
"1": 1,
|
|
|
|
|
|
"1001": 1001,
|
|
|
|
|
|
"33": 33,
|
|
|
|
|
|
"49": 33,
|
|
|
|
|
|
"65": 65
|
|
|
|
|
|
}
|
|
|
|
|
|
},
|
|
|
|
|
|
"Dist": {
|
|
|
|
|
|
"1": {
|
|
|
|
|
|
"1": 0,
|
|
|
|
|
|
"1001": 0.033121187,
|
|
|
|
|
|
"33": 0.075119328,
|
|
|
|
|
|
"49": 0.102236885,
|
|
|
|
|
|
"65": 0.074688856,
|
|
|
|
|
|
"9": 0.022473723
|
|
|
|
|
|
},
|
|
|
|
|
|
"1001": {
|
|
|
|
|
|
"1": 0.018561948,
|
|
|
|
|
|
"1001": 0,
|
|
|
|
|
|
"33": 0.064077348,
|
|
|
|
|
|
"49": 0.094459818,
|
|
|
|
|
|
"65": 0.079481599,
|
|
|
|
|
|
"9": 0.011163433
|
|
|
|
|
|
},
|
|
|
|
|
|
"33": {
|
|
|
|
|
|
"1": 0.075263428,
|
|
|
|
|
|
"1001": 0.070029457,
|
|
|
|
|
|
"33": 0,
|
|
|
|
|
|
"49": 0.032631349,
|
|
|
|
|
|
"65": 0.045575061,
|
|
|
|
|
|
"9": 0.050444255
|
|
|
|
|
|
},
|
|
|
|
|
|
"49": {
|
|
|
|
|
|
"1": 0.100271358,
|
|
|
|
|
|
"1001": 0.097665675,
|
|
|
|
|
|
"33": 0.034563118,
|
|
|
|
|
|
"49": 0,
|
|
|
|
|
|
"65": 0.017950046,
|
|
|
|
|
|
"9": 0.07510982
|
|
|
|
|
|
},
|
|
|
|
|
|
"65": {
|
|
|
|
|
|
"1": 0.114219741,
|
|
|
|
|
|
"1001": 0.132759205,
|
|
|
|
|
|
"33": 0.095265063,
|
|
|
|
|
|
"49": 0.067413235,
|
|
|
|
|
|
"65": 0,
|
|
|
|
|
|
"9": 0.127562362
|
|
|
|
|
|
},
|
|
|
|
|
|
"9": {
|
|
|
|
|
|
"1": 0.026909699,
|
|
|
|
|
|
"1001": 0.022555855,
|
|
|
|
|
|
"33": 0.056469043,
|
|
|
|
|
|
"49": 0.089100392,
|
|
|
|
|
|
"65": 0.08525314,
|
|
|
|
|
|
"9": 0
|
|
|
|
|
|
}
|
|
|
|
|
|
}
|
|
|
|
|
|
}
|
|
|
|
|
|
```
|
|
|
|
|
|
|
|
|
|
|
|
欄位意義:
|
|
|
|
|
|
1. PeerInfo: 節點id,名稱,上次上線時間
|
|
|
|
|
|
2. Edges: 節點**直連的延遲**,99999或是缺失代表不可達(打洞失敗)
|
|
|
|
|
|
3. NhTable: 計算結果
|
|
|
|
|
|
4. Dist: 節點走**Etherguard之後的延遲**
|
|
|
|
|
|
|
2021-09-23 13:31:01 +02:00
|
|
|
|
### peeradd
|
2021-09-29 02:23:59 +02:00
|
|
|
|
再來是新增peer,可以不用重啟Supernode就新增Peer
|
2021-09-23 13:31:01 +02:00
|
|
|
|
|
|
|
|
|
|
範例:
|
|
|
|
|
|
```
|
|
|
|
|
|
curl -X POST "http://127.0.0.1:3000/api/peer/add?Password=passwd_addpeer" \
|
2021-09-29 02:23:59 +02:00
|
|
|
|
-H "Content-Type: application/x-www-form-urlencoded" \
|
|
|
|
|
|
-d "nodeid=100&name=Node_100&pubkey=6SuqwPH9pxGigtZDNp3PABZYfSEzDaBSwuThsUUAcyM="
|
2021-09-23 13:31:01 +02:00
|
|
|
|
```
|
|
|
|
|
|
參數:
|
2021-09-29 02:23:59 +02:00
|
|
|
|
1. URL query: Password: 新增peer用的密碼,在設定檔配置
|
2021-09-23 13:31:01 +02:00
|
|
|
|
1. Post body:
|
|
|
|
|
|
1. nodeid: Node ID
|
|
|
|
|
|
1. pubkey: Public Key
|
|
|
|
|
|
1. pskey: Preshared Key
|
|
|
|
|
|
|
2021-09-29 02:23:59 +02:00
|
|
|
|
返回值:
|
|
|
|
|
|
1. http code != 200: 出錯原因
|
|
|
|
|
|
2. http code == 200,一份edge的參考設定檔
|
|
|
|
|
|
* 會根據 `edgetemplate` 裡面的內容,再填入使用者的資訊(nodeid/name/pubkey)
|
|
|
|
|
|
* 方便使用者複製貼上
|
|
|
|
|
|
```yaml
|
|
|
|
|
|
interface:
|
|
|
|
|
|
itype: stdio
|
|
|
|
|
|
name: tap1
|
|
|
|
|
|
vppifaceid: 1
|
|
|
|
|
|
vppbridgeid: 4242
|
|
|
|
|
|
macaddrprefix: AA:BB:CC:DD
|
|
|
|
|
|
mtu: 1416
|
|
|
|
|
|
recvaddr: 127.0.0.1:4001
|
|
|
|
|
|
sendaddr: 127.0.0.1:5001
|
|
|
|
|
|
l2headermode: kbdbg
|
|
|
|
|
|
nodeid: 100
|
|
|
|
|
|
nodename: Node_100
|
|
|
|
|
|
defaultttl: 200
|
|
|
|
|
|
privkey: Your_Private_Key
|
|
|
|
|
|
listenport: 3001
|
|
|
|
|
|
loglevel:
|
|
|
|
|
|
loglevel: normal
|
|
|
|
|
|
logtransit: true
|
|
|
|
|
|
logcontrol: true
|
|
|
|
|
|
lognormal: true
|
|
|
|
|
|
logntp: true
|
|
|
|
|
|
dynamicroute:
|
|
|
|
|
|
sendpinginterval: 16
|
|
|
|
|
|
peeralivetimeout: 30
|
|
|
|
|
|
dupchecktimeout: 40
|
|
|
|
|
|
conntimeout: 30
|
|
|
|
|
|
connnexttry: 5
|
|
|
|
|
|
savenewpeers: true
|
|
|
|
|
|
supernode:
|
|
|
|
|
|
usesupernode: true
|
|
|
|
|
|
pskey: ""
|
|
|
|
|
|
connurlv4: 127.0.0.1:3000
|
|
|
|
|
|
pubkeyv4: LJ8KKacUcIoACTGB/9Ed9w0osrJ3WWeelzpL2u4oUic=
|
|
|
|
|
|
connurlv6: ""
|
|
|
|
|
|
pubkeyv6: HCfL6YJtpJEGHTlJ2LgVXIWKB/K95P57LHTJ42ZG8VI=
|
|
|
|
|
|
apiurl: http://127.0.0.1:3000/api
|
|
|
|
|
|
supernodeinfotimeout: 50
|
|
|
|
|
|
p2p:
|
|
|
|
|
|
usep2p: false
|
|
|
|
|
|
sendpeerinterval: 20
|
|
|
|
|
|
graphrecalculatesetting:
|
|
|
|
|
|
jittertolerance: 20
|
|
|
|
|
|
jittertolerancemultiplier: 1.1
|
|
|
|
|
|
nodereporttimeout: 40
|
|
|
|
|
|
recalculatecooldown: 5
|
|
|
|
|
|
ntpconfig:
|
|
|
|
|
|
usentp: true
|
|
|
|
|
|
maxserveruse: 8
|
|
|
|
|
|
synctimeinterval: 3600
|
|
|
|
|
|
ntptimeout: 3
|
|
|
|
|
|
servers:
|
|
|
|
|
|
- time.google.com
|
|
|
|
|
|
- time1.google.com
|
|
|
|
|
|
- time2.google.com
|
|
|
|
|
|
- time3.google.com
|
|
|
|
|
|
- time4.google.com
|
|
|
|
|
|
- time1.facebook.com
|
|
|
|
|
|
- time2.facebook.com
|
|
|
|
|
|
- time3.facebook.com
|
|
|
|
|
|
- time4.facebook.com
|
|
|
|
|
|
- time5.facebook.com
|
|
|
|
|
|
- time.cloudflare.com
|
|
|
|
|
|
- time.apple.com
|
|
|
|
|
|
- time.asia.apple.com
|
|
|
|
|
|
- time.euro.apple.com
|
|
|
|
|
|
- time.windows.com
|
|
|
|
|
|
nexthoptable: {}
|
|
|
|
|
|
resetconninterval: 86400
|
|
|
|
|
|
peers: []
|
|
|
|
|
|
```
|
|
|
|
|
|
|
2021-09-23 13:31:01 +02:00
|
|
|
|
### peerdel
|
2021-09-29 02:23:59 +02:00
|
|
|
|
最後是刪除peer。
|
|
|
|
|
|
有兩種刪除模式,分別是使用Password刪除,以及使用privkey刪除。
|
|
|
|
|
|
設計上分別是給管理員使用,或是給加入網路的人,想離開網路使用
|
2021-09-23 13:31:01 +02:00
|
|
|
|
|
2021-09-29 02:23:59 +02:00
|
|
|
|
使用Password刪除可以刪除任意節點,以上面新增的節點為例,使用這個API即可刪除剛剛新增的節點
|
2021-09-23 13:31:01 +02:00
|
|
|
|
```
|
2021-09-29 02:23:59 +02:00
|
|
|
|
curl "http://127.0.0.1:3000/api/peer/del?Password=passwd_delpeer&nodeid=100"
|
2021-09-23 13:31:01 +02:00
|
|
|
|
```
|
2021-08-26 21:06:15 +02:00
|
|
|
|
|
2021-09-29 02:23:59 +02:00
|
|
|
|
也可以使用privkey刪除,同上,但是只要附上privkey參數就好
|
|
|
|
|
|
```
|
|
|
|
|
|
curl "http://127.0.0.1:3000/api/peer/del?privkey=IJtpnkm9ytbuCukx4VBMENJKuLngo9KSsS1D60BqonQ="
|
|
|
|
|
|
```
|
|
|
|
|
|
|
|
|
|
|
|
參數:
|
|
|
|
|
|
1. URL query:
|
|
|
|
|
|
1. Password: 刪除peer用的密碼,在設定檔配置
|
|
|
|
|
|
1. nodeid: 你想刪除的Node ID
|
|
|
|
|
|
1. privkey: 該節點的私鑰
|
|
|
|
|
|
|
|
|
|
|
|
返回值:
|
2021-09-30 23:15:23 +02:00
|
|
|
|
1. http code != 200: 錯誤訊息
|
|
|
|
|
|
2. http code == 200: 被刪除的nodeID
|
2021-09-29 02:23:59 +02:00
|
|
|
|
|
2021-09-30 23:15:23 +02:00
|
|
|
|
## Config Parameters
|
2021-08-26 21:06:15 +02:00
|
|
|
|
|
|
|
|
|
|
### Super mode的edge node有幾個參數
|
|
|
|
|
|
1. `usesupernode`: 是否啟用Super mode
|
2021-09-30 23:15:23 +02:00
|
|
|
|
1. `pskey`: 和supernode建立連線用的Pre shared Key
|
2021-08-26 21:06:15 +02:00
|
|
|
|
1. `connurlv4`: Super node的IPv4連線地址
|
|
|
|
|
|
1. `pubkeyv4`: Super node的IPv4工鑰
|
|
|
|
|
|
1. `connurlv6`: Super node的IPv6連線地址
|
|
|
|
|
|
1. `pubkeyv6`: Super node的IPv6工鑰
|
|
|
|
|
|
1. `apiurl`: Super node的HTTP(S) API連線地址
|
|
|
|
|
|
1. `supernodeinfotimeout`: Supernode Timeout
|
|
|
|
|
|
|
|
|
|
|
|
### Super node本身的設定檔
|
|
|
|
|
|
|
|
|
|
|
|
1. nodename: 節點名稱
|
|
|
|
|
|
1. privkeyv4: ipv4用的私鑰
|
|
|
|
|
|
1. privkeyv6: ipv6用的私鑰
|
|
|
|
|
|
1. listenport: 監聽udp埠號
|
|
|
|
|
|
1. loglevel: 參考 [README_zh.md](../README_zh.md)
|
|
|
|
|
|
1. repushconfiginterval: 重新push`UpdateXXX`的間格
|
2021-09-23 13:31:01 +02:00
|
|
|
|
1. passwords: HTTP API 密碼
|
|
|
|
|
|
1. showstate: 節點資訊
|
|
|
|
|
|
1. addpeer: 新增peer
|
|
|
|
|
|
1. delpeer: 刪除peer
|
2021-09-30 23:15:23 +02:00
|
|
|
|
1. graphrecalculatesetting: 一些和[Floyd-Warshall演算法](https://zh.wikipedia.org/zh-tw/Floyd-Warshall算法)相關的參數
|
|
|
|
|
|
1. staticmode: 關閉Floyd-Warshall演算法,只使用一開始載入的nexthoptable。Supernode單純用來輔助打洞
|
|
|
|
|
|
1. recalculatecooldown: Floyd-Warshal是O(n^3)時間複雜度,不能太常算。設個冷卻時間
|
|
|
|
|
|
1. jittertolerance: 抖動容許誤差,收到Pong以後,一個37ms,一個39ms,不會觸發重新計算
|
|
|
|
|
|
1. jittertolerancemultiplier: 一樣是抖動容許誤差,但是高ping的話允許更多誤差
|
2021-08-26 21:06:15 +02:00
|
|
|
|
https://www.desmos.com/calculator/raoti16r5n
|
2021-09-30 23:15:23 +02:00
|
|
|
|
1. nodereporttimeout: 收到的`Pong`封包的有效期限。太久沒收到就變回Infinity
|
|
|
|
|
|
1. nexthoptable: 僅在`staticmode==true` 有效,手動設定的nexthoptable
|
2021-09-23 13:31:01 +02:00
|
|
|
|
1. edgetemplate: 給`addpeer`API用的。參考這個設定檔,顯示一個範例設定檔給edge
|
2021-09-30 23:15:23 +02:00
|
|
|
|
1. usepskforinteredge: 是否啟用edge間pre shares key通信。若啟用則幫edge們自動生成PSK
|
2021-08-26 21:06:15 +02:00
|
|
|
|
1. peers: Peer列表,參考 [README_zh.md](../README_zh.md)
|
2021-09-21 22:10:11 +02:00
|
|
|
|
1. nodeid: Peer的節點ID
|
|
|
|
|
|
1. name: Peer名稱(顯示在前端)
|
|
|
|
|
|
1. pubkey: peer 公鑰
|
2021-09-23 13:31:01 +02:00
|
|
|
|
1. pskey: preshared key 該peer和本Supernode連線的PSK
|
|
|
|
|
|
|
2021-08-26 21:06:15 +02:00
|
|
|
|
|
|
|
|
|
|
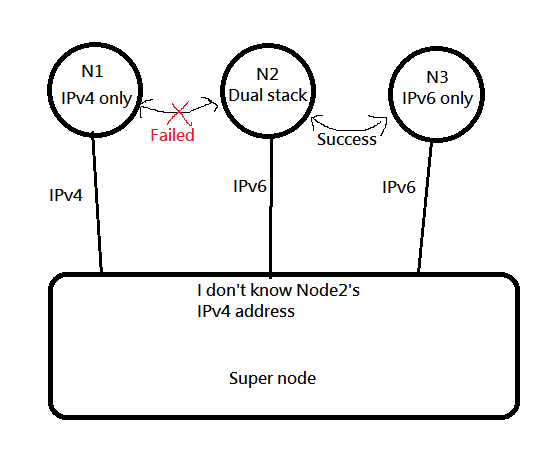
## V4 V6 兩個公鑰
|
|
|
|
|
|
為什麼要分開IPv4和IPv6呢?
|
|
|
|
|
|
因為有這種情況:
|
|
|
|
|
|
|
|
|
|
|
|
|
|
|
|
|
|
|
|
|
|
|
|
這樣的話SuperNode就不知道Node02的ipv4地址,就不能幫助Node1和Node2打洞了
|
|
|
|
|
|
|
|
|
|
|
|
|
|
|
|
|
|
|
2021-09-23 13:31:01 +02:00
|
|
|
|
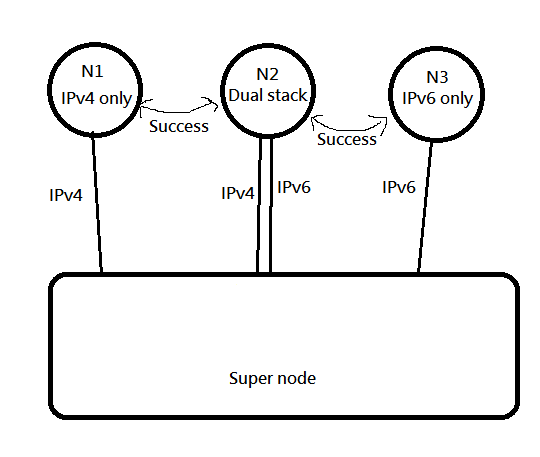
所以要像這樣,V4和V6都建立一條通道,才能讓V4和V6同時都被處理到
|
|
|
|
|
|
|
|
|
|
|
|
## 打洞可行性
|
|
|
|
|
|
對於不同的NAT type,打洞的可行性可以參考這張圖([出處](https://dh2i.com/kbs/kbs-2961448-understanding-different-nat-types-and-hole-punching/))
|
|
|
|
|
|
|
2021-09-30 23:15:23 +02:00
|
|
|
|

|
2021-09-23 13:31:01 +02:00
|
|
|
|
|
|
|
|
|
|
還有,就算雙方都是ConeNAT,也不保證100%成功。
|
2021-09-29 02:23:59 +02:00
|
|
|
|
還得看NAT設備的支援情況,詳見[此文](https://bford.info/pub/net/p2pnat/#SECTION00035000000000000000),裡面3.5章節描述的情況,也無法打洞成功
|
2021-09-23 13:31:01 +02:00
|
|
|
|
|
|
|
|
|
|
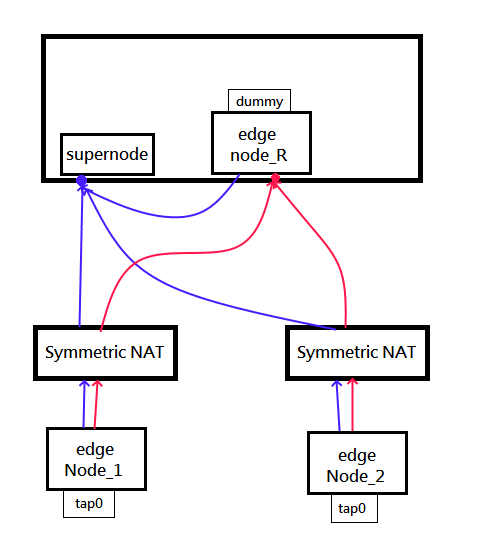
## Relay node
|
|
|
|
|
|
因為Etherguard的Supernode單純只負責幫忙打洞+計算[Floyd-Warshall](https://zh.wikipedia.org/zh-tw/Floyd-Warshall算法),並分發運算結果
|
|
|
|
|
|
而他本身並不參與資料轉發。因此如上章節描述打洞失敗,且沒有任何可達路徑的話,就需要搭建relay node
|
|
|
|
|
|
基本上任意一個節點有公網ip,就不用擔心沒有路徑可達了。但是還是說明一下
|
|
|
|
|
|
|
|
|
|
|
|
Relay node其實也是一個edge node,只不過被設定成為interface=dummy,不串接任何真實接口
|
|
|
|
|
|
|
|
|
|
|
|
只是在設定時要注意,Supernode地只要設定成Supernode的**外網ip**。
|
|
|
|
|
|
因為如果用127.0.0.1連接supernode,supernode看到封包的src IP就是127.0.0.1,就會把127.0.0.1分發給`Node_1`和`Node_2`
|
|
|
|
|
|
`Node_1`和`Node_2`看到`Node_R`的連線地址是`127.0.0.1`,就連不上了
|
|
|
|
|
|
|
2021-09-30 23:15:23 +02:00
|
|
|
|
## Quick start
|
|
|
|
|
|
執行此範例設定檔(請開三個terminal):
|
|
|
|
|
|
```bash
|
|
|
|
|
|
./etherguard-go -config example_config/super_mode/s1.yaml -mode super
|
|
|
|
|
|
./etherguard-go -config example_config/super_mode/n1.yaml -mode edge
|
|
|
|
|
|
./etherguard-go -config example_config/super_mode/n2.yaml -mode edge
|
|
|
|
|
|
```
|
|
|
|
|
|
因為是stdio模式,stdin會讀入VPN網路
|
|
|
|
|
|
請在其中一個edge視窗中鍵入
|
|
|
|
|
|
```
|
|
|
|
|
|
b1aaaaaaaaaa
|
|
|
|
|
|
```
|
|
|
|
|
|
b1會被轉換成 12byte 的layer 2 header,b是廣播地址`FF:FF:FF:FF:FF:FF`,1是普通地址`AA:BB:CC:DD:EE:01`,aaaaaaaaaa是後面的payload,然後再丟入VPN
|
|
|
|
|
|
此時應該要能夠在另一個視窗上看見字串b1aaaaaaaaaa。前12byte被轉換回來了
|
2021-09-23 13:31:01 +02:00
|
|
|
|
|
|
|
|
|
|
看完本章捷,接下來你就能了解一下[P2P Mode的運作](../p2p_mode/README_zh.md)
|