| .. | ||
| Example_static.png | ||
| n1.yaml | ||
| n2.yaml | ||
| n3.yaml | ||
| n4.yaml | ||
| n5.yaml | ||
| n6.yaml | ||
| path.txt | ||
| README_zh.md | ||
| README.md | ||
Etherguard
This is the documentation of the static_mode of this example_config
Static mode
No dynamic routing, no handshake server.
Similar to original wireguard , all things must be preconfigured.
But you need to setup an additional Next hop table, this table are share among all nodes.
The nexthoptable section is for this mode, and only works in this mode.
In this mode, there are no any Control Message, no connectivity check.
Please maintains the predefined topology, otherwise if the relay node offline, part of this network will broken,
The topology of this example_config:
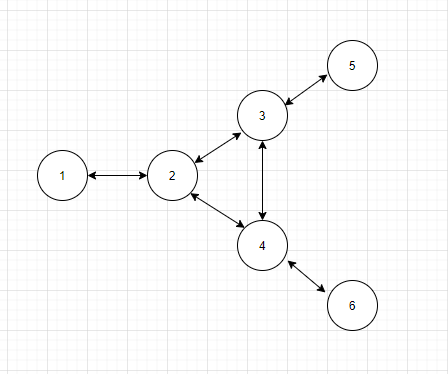
Before sending packet, We will set the SrcID to my NodeID. And the DstID will be found from l2fib table. If lookup failed or it's a Broadcast address, It will be set to Broadcast(65535)
While received packet, if the DstID==NodeID, or DstID==65535, it will receive the packet, and send to correspond tap device. And meanwhile, add the NodeID->SrcMacAddress to l2fib.
If not, it will lookup from the Next hop table, to determine who will be sent of this packet.
Here is an example of the Next hop table in this example topology. A yaml formatted nested dictionary. NhTable[SrcID][DstID]= Next hop ID
nexthoptable:
  1:
    2: 2
    3: 2
    4: 2
    5: 2
    6: 2
  2:
    1: 1
    3: 3
    4: 4
    5: 3
    6: 4
  3:
    1: 2
    2: 2
    4: 4
    5: 5
    6: 4
  4:
    1: 2
    2: 2
    3: 3
    5: 3
    6: 6
  5:
    1: 3
    2: 3
    3: 3
    4: 3
    6: 3
  6:
    1: 4
    2: 4
    3: 4
    4: 4
    5: 4
Broadcast
Broadcast is a special case.
Today I am Node 4, and I received a Src=1, dst=Broadcast.
I should send to Node 6 ONLY without sending it to Node 3.
Cuz Node 3 should receive it from Node 2 Instead of me.
So if dst=Broadcast, I will check src to all my neighbors whether I am a required route of this packet.
1 -> 6 : [1 2 4 6] , I am a required route
1 -> 3 : [1 2 3] , I am not a required route
1 -> 3 : Skip check, packet is coming from it
So I knows I should send this packet to Node 6 only.
Next Hop Table calculator
This tool can also calculate Next Hop Table for you.
Prepare a path.txt first, mark all single way latency in it like this:
X 1   2   3   4   5   6
1 0   0.5 Inf Inf Inf Inf
2 0.5 0   0.5 0.5 Inf Inf
3 Inf 0.5 0   0.5 0.5 Inf
4 Inf 0.5 0.5 0   Inf 0.5
5 Inf Inf 0.5 Inf 0   Inf
6 Inf Inf Inf 0.5 Inf 0
Inf means unreachable.
Then use this command to calculate it.
./etherguard-go -config example_config/static_mode/path.txt -mode solve

NextHopTable:
  1:
    2: 2
    3: 2
    4: 2
    5: 2
    6: 2
  2:
    1: 1
    3: 3
    4: 4
    5: 3
    6: 4
  3:
    1: 2
    2: 2
    4: 4
    5: 5
    6: 4
  4:
    1: 2
    2: 2
    3: 3
    5: 3
    6: 6
  5:
    1: 3
    2: 3
    3: 3
    4: 3
    6: 3
  6:
    1: 4
    2: 4
    3: 4
    4: 4
    5: 4
There are some additional information of the calculation result.
Human readable:
src     dist            path
1 -> 2  0.500000        [1 2]
1 -> 3  1.000000        [1 2 3]
1 -> 4  1.000000        [1 2 4]
1 -> 5  1.500000        [1 2 3 5]
1 -> 6  1.500000        [1 2 4 6]
2 -> 1  0.500000        [2 1]
2 -> 3  0.500000        [2 3]
2 -> 4  0.500000        [2 4]
2 -> 5  1.000000        [2 3 5]
2 -> 6  1.000000        [2 4 6]
3 -> 1  1.000000        [3 2 1]
3 -> 2  0.500000        [3 2]
3 -> 4  0.500000        [3 4]
3 -> 5  0.500000        [3 5]
3 -> 6  1.000000        [3 4 6]
4 -> 1  1.000000        [4 2 1]
4 -> 2  0.500000        [4 2]
4 -> 3  0.500000        [4 3]
4 -> 5  1.000000        [4 3 5]
4 -> 6  0.500000        [4 6]
5 -> 1  1.500000        [5 3 2 1]
5 -> 2  1.000000        [5 3 2]
5 -> 3  0.500000        [5 3]
5 -> 4  1.000000        [5 3 4]
5 -> 6  1.500000        [5 3 4 6]
6 -> 1  1.500000        [6 4 2 1]
6 -> 2  1.000000        [6 4 2]
6 -> 3  1.000000        [6 4 3]
6 -> 4  0.500000        [6 4]
6 -> 5  1.500000        [6 4 3 5]
Quick start
Run example config
Execute following command in Different Terminal
./etherguard-go -config example_config/super_mode/n1.yaml -mode edge
./etherguard-go -config example_config/super_mode/n2.yaml -mode edge
./etherguard-go -config example_config/super_mode/n3.yaml -mode edge
./etherguard-go -config example_config/super_mode/n4.yaml -mode edge
./etherguard-go -config example_config/super_mode/n5.yaml -mode edge
./etherguard-go -config example_config/super_mode/n6.yaml -mode edge
The iface type of this example config is stdio (keyboard debug), so it will read data from stdin.
Then input following text in the terminal
b1message
The l2headermode is kbdbg, means Keyboard debug. So that the first two byte will be convert to FF:FF:FF:FF:FF:FF, and AA:BB:CC:DD:EE:01. And the message is the real payload.
With other debug message, you should be able to see the message in other terminal.
Use it in real world
Please modify the itype to tap, and modify the pubkey and privkey, close unnecessary logging , and deploy to all nodes.