15 KiB
Etherguard
Super Mode的範例配置檔的說明文件 在了解Super Mode的運作之前,建議您先閱讀Static Mode的運作方法,再閱讀本篇會比較好
Super Mode
Super Mode是受到n2n的啟發
分為super node和edge node兩種節點
全部節點都會和supernode建立連線
藉由supernode交換其他節點的資訊,以及udp打洞
由supernode執行Floyd-Warshall演算法,並把計算結果分發給全部edge node
在super mode模式下,設定檔裡面的nexthoptable以及peers是無效的。
這些資訊都是從super node上面下載
同時,supernode會幫每個連線生成Preshared Key,分發給edge使用。
psk = shs256("PubkeyPeerA" + "PubkeyPeerB" + "主廚特調當季精選海鹽")[:32]
SuperMsg
但是比起Static mode,Super mode引入了一種新的 終點ID 叫做 SuperMsg。
所有送往Super node的封包都會是這種類型。
這種封包不會在edge node之間傳播,收到也會不會轉給任何人,如同終點ID == 自己一般
Register
具體運作方式類似這張圖
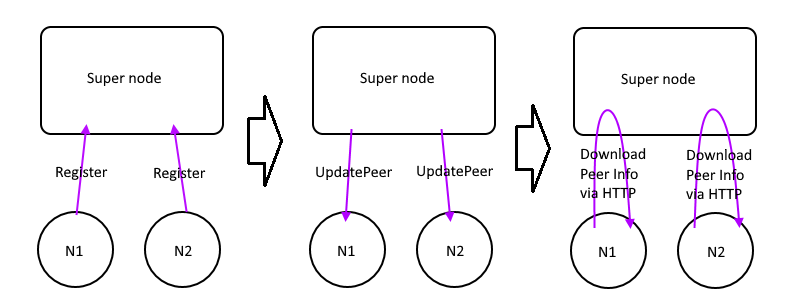
首先edge node發送regiater給super node
super node收到以後就知道這個edge的endpoint IP和埠號。
更新進資料庫以後發布UpdatePeerMsg。
其他edge node收到以後就用HTTP API去下載完整的peer list。並且把自己沒有的peer通通加到本地
Ping/Pong
有了peer list以後,接下來的運作方式類似這張圖
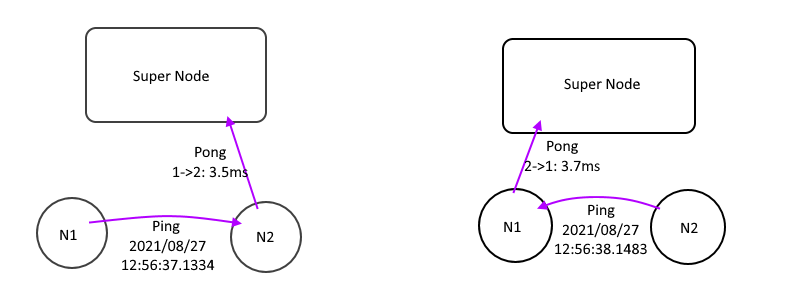
Edge node 會嘗試向其他所有peer發送Ping,裡面會攜帶節點自己的時間
Ping 封包的TTL=0 所以不會被轉發,只會抵達可以直連的節點
收到Ping,就會產生一個Pong,並攜帶時間差。這個時間就是單向延遲
但是他不會把Pong送回給原節點,而是送給Super node
轉發表
Super node收到節點們傳來的Pong以後,就知道他們的單向延遲了。接下來的運作方式類似這張圖
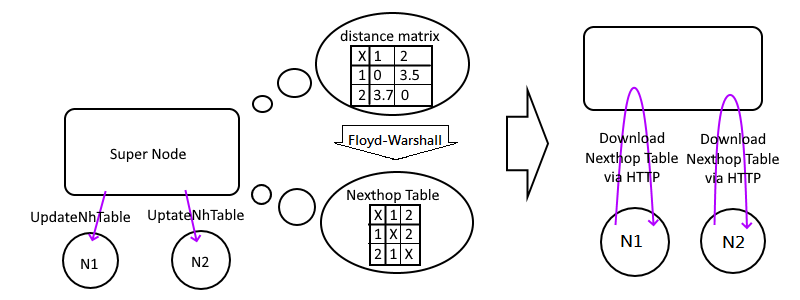
Super node收到Pong以後,就會更新它裡面的Distance matrix,並且重新計算轉發表
如果有變動,就發布UpdateNhTableMsg
其他edge node收到以後就用HTTP API去下載完整的轉發表
HTTP API
為什麼要用HTTP額外下載呢?直接UpdateXXX夾帶資訊不好嗎?
因為udp是不可靠協議,能攜帶的內容量也有上限。
但是peer list包含了全部的peer資訊,長度不是固定的,可能超過
所以這樣設計,UpdateXXX單純只是告訴edge node有資訊更新,請速速用HTTP下載
而且UpdateXXX本身不可靠,說不定根本就沒抵達edge node。
所以UpdateXXX這類資訊都帶了state hash。用HTTP API的時候要帶上
這樣super node收到HTTP API看到state hash就知道這個edge node確實有收到UpdateXXX了。
不然每隔一段時間就會重新發送UpdateXXX給該節點
peerstate
HTTP還有三個個API,首先是這個peerstate
http://127.0.0.1:3000/api/peerstate?Password=passwd
可以給前端看的,用來顯示現在各節點之間的單向延遲狀況
之後可以用來畫力導向圖。
這個json下載下來有一個叫做infinity的欄位,值應該永遠是99999
因為json沒辦法表達無限大。所以大於這個數值的就是無限大,不可達的意思
這個數值是編譯時決定的,一般不會動。但保留變更的彈性
所以有這個欄位,前端顯示時看到數值大於這個,就視為不可達,不用畫線了
返回值範例:
{
  "PeerInfo": {
    "1": {
      "Name": "hk",
      "LastSeen": "2021-09-29 11:23:22.854700559 +0000 UTC m=+28740.116476977"
    },
    "1001": {
      "Name": "relay_kr",
      "LastSeen": "2021-09-29 11:23:21.277417897 +0000 UTC m=+28738.539194315"
    },
    "121": {
      "Name": "za_north",
      "LastSeen": "0001-01-01 00:00:00 +0000 UTC"
    },
    "33": {
      "Name": "us_west",
      "LastSeen": "2021-09-29 11:23:13.257033252 +0000 UTC m=+28730.518809670"
    },
    "49": {
      "Name": "us_east",
      "LastSeen": "2021-09-29 11:23:16.606165241 +0000 UTC m=+28733.867941659"
    },
    "51": {
      "Name": "ca_central",
      "LastSeen": "0001-01-01 00:00:00 +0000 UTC"
    },
    "65": {
      "Name": "fr",
      "LastSeen": "2021-09-29 11:23:19.4084596 +0000 UTC m=+28736.670236018"
    },
    "81": {
      "Name": "au_central",
      "LastSeen": "0001-01-01 00:00:00 +0000 UTC"
    },
    "89": {
      "Name": "uae_north",
      "LastSeen": "0001-01-01 00:00:00 +0000 UTC"
    },
    "9": {
      "Name": "jp_east",
      "LastSeen": "2021-09-29 11:23:16.669505147 +0000 UTC m=+28733.931281565"
    },
    "97": {
      "Name": "br_south",
      "LastSeen": "0001-01-01 00:00:00 +0000 UTC"
    }
  },
  "Infinity": 99999,
  "Edges": {
    "1": {
      "1001": 0.033121187,
      "33": 0.075653164,
      "49": 0.100471502,
      "65": 0.065714769,
      "9": 0.022864241
    },
    "1001": {
      "1": 0.018561948,
      "33": 0.064077348,
      "49": 0.094459818,
      "65": 0.079481599,
      "9": 0.011163433
    },
    "33": {
      "1": 0.075263428,
      "1001": 0.070029457,
      "49": 0.032631349,
      "65": 0.045575061,
      "9": 0.050444255
    },
    "49": {
      "1": 0.100271358,
      "1001": 0.100182834,
      "33": 0.034563118,
      "65": 0.017950046,
      "9": 0.07510982
    },
    "65": {
      "1": 0.114219741,
      "1001": 0.132759205,
      "33": 0.095265063,
      "49": 0.067413235,
      "9": 0.127562362
    },
    "9": {
      "1": 0.026909699,
      "1001": 0.022555855,
      "33": 0.056469043,
      "49": 0.090400723,
      "65": 0.08525314
    }
  },
  "NhTable": {
    "1": {
      "1001": 1001,
      "33": 33,
      "49": 49,
      "65": 65,
      "9": 9
    },
    "1001": {
      "1": 1,
      "33": 33,
      "49": 49,
      "65": 65,
      "9": 9
    },
    "33": {
      "1": 1,
      "1001": 1001,
      "49": 49,
      "65": 65,
      "9": 9
    },
    "49": {
      "1": 1,
      "1001": 9,
      "33": 33,
      "65": 65,
      "9": 9
    },
    "65": {
      "1": 1,
      "1001": 1001,
      "33": 33,
      "49": 49,
      "9": 9
    },
    "9": {
      "1": 1,
      "1001": 1001,
      "33": 33,
      "49": 33,
      "65": 65
    }
  },
  "Dist": {
    "1": {
      "1": 0,
      "1001": 0.033121187,
      "33": 0.075119328,
      "49": 0.102236885,
      "65": 0.074688856,
      "9": 0.022473723
    },
    "1001": {
      "1": 0.018561948,
      "1001": 0,
      "33": 0.064077348,
      "49": 0.094459818,
      "65": 0.079481599,
      "9": 0.011163433
    },
    "33": {
      "1": 0.075263428,
      "1001": 0.070029457,
      "33": 0,
      "49": 0.032631349,
      "65": 0.045575061,
      "9": 0.050444255
    },
    "49": {
      "1": 0.100271358,
      "1001": 0.097665675,
      "33": 0.034563118,
      "49": 0,
      "65": 0.017950046,
      "9": 0.07510982
    },
    "65": {
      "1": 0.114219741,
      "1001": 0.132759205,
      "33": 0.095265063,
      "49": 0.067413235,
      "65": 0,
      "9": 0.127562362
    },
    "9": {
      "1": 0.026909699,
      "1001": 0.022555855,
      "33": 0.056469043,
      "49": 0.089100392,
      "65": 0.08525314,
      "9": 0
    }
  }
}
欄位意義:
- PeerInfo: 節點id,名稱,上次上線時間
- Edges: 節點直連的延遲,99999或是缺失代表不可達(打洞失敗)
- NhTable: 計算結果
- Dist: 節點走Etherguard之後的延遲
peeradd
再來是新增peer,可以不用重啟Supernode就新增Peer
範例:
curl -X POST "http://127.0.0.1:3000/api/peer/add?Password=passwd_addpeer" \
                           -H "Content-Type: application/x-www-form-urlencoded" \
                           -d "nodeid=100&name=Node_100&pubkey=6SuqwPH9pxGigtZDNp3PABZYfSEzDaBSwuThsUUAcyM="
參數:
- URL query: Password: 新增peer用的密碼,在設定檔配置
- Post body:
- nodeid: Node ID
- pubkey: Public Key
- pskey: Preshared Key
返回值:
- http code != 200: 出錯原因
- http code == 200,一份edge的參考設定檔
- 會根據
edgetemplate裡面的內容,再填入使用者的資訊(nodeid/name/pubkey) - 方便使用者複製貼上
- 會根據
interface:
  itype: stdio
  name: tap1
  vppifaceid: 1
  vppbridgeid: 4242
  macaddrprefix: AA:BB:CC:DD
  mtu: 1416
  recvaddr: 127.0.0.1:4001
  sendaddr: 127.0.0.1:5001
  l2headermode: kbdbg
nodeid: 100
nodename: Node_100
defaultttl: 200
privkey: Your_Private_Key
listenport: 3001
loglevel:
  loglevel: normal
  logtransit: true
  logcontrol: true
  lognormal: true
  logntp: true
dynamicroute:
  sendpinginterval: 16
  peeralivetimeout: 30
  dupchecktimeout: 40
  conntimeout: 30
  connnexttry: 5
  savenewpeers: true
  supernode:
    usesupernode: true
    pskey: ""
    connurlv4: 127.0.0.1:3000
    pubkeyv4: LJ8KKacUcIoACTGB/9Ed9w0osrJ3WWeelzpL2u4oUic=
    connurlv6: ""
    pubkeyv6: HCfL6YJtpJEGHTlJ2LgVXIWKB/K95P57LHTJ42ZG8VI=
    apiurl: http://127.0.0.1:3000/api
    supernodeinfotimeout: 50
  p2p:
    usep2p: false
    sendpeerinterval: 20
    graphrecalculatesetting:
      jittertolerance: 20
      jittertolerancemultiplier: 1.1
      nodereporttimeout: 40
      recalculatecooldown: 5
  ntpconfig:
    usentp: true
    maxserveruse: 8
    synctimeinterval: 3600
    ntptimeout: 3
    servers:
    - time.google.com
    - time1.google.com
    - time2.google.com
    - time3.google.com
    - time4.google.com
    - time1.facebook.com
    - time2.facebook.com
    - time3.facebook.com
    - time4.facebook.com
    - time5.facebook.com
    - time.cloudflare.com
    - time.apple.com
    - time.asia.apple.com
    - time.euro.apple.com
    - time.windows.com
nexthoptable: {}
resetconninterval: 86400
peers: []
peerdel
最後是刪除peer。
有兩種刪除模式,分別是使用Password刪除,以及使用privkey刪除。
設計上分別是給管理員使用,或是給加入網路的人,想離開網路使用
使用Password刪除可以刪除任意節點,以上面新增的節點為例,使用這個API即可刪除剛剛新增的節點
curl "http://127.0.0.1:3000/api/peer/del?Password=passwd_delpeer&nodeid=100"
也可以使用privkey刪除,同上,但是只要附上privkey參數就好
curl "http://127.0.0.1:3000/api/peer/del?privkey=IJtpnkm9ytbuCukx4VBMENJKuLngo9KSsS1D60BqonQ="
參數:
- URL query:
- Password: 刪除peer用的密碼,在設定檔配置
- nodeid: 你想刪除的Node ID
- privkey: 該節點的私鑰
返回值:
- http code != 200: 被刪除的nodeID
- http code == 200: 空字串,表示成功
Config Paramaters
Super mode的edge node有幾個參數
usesupernode: 是否啟用Super modepskey: 和supernode建立連線用的Preshared Keyconnurlv4: Super node的IPv4連線地址pubkeyv4: Super node的IPv4工鑰connurlv6: Super node的IPv6連線地址pubkeyv6: Super node的IPv6工鑰apiurl: Super node的HTTP(S) API連線地址supernodeinfotimeout: Supernode Timeout
Super node本身的設定檔
- nodename: 節點名稱
- privkeyv4: ipv4用的私鑰
- privkeyv6: ipv6用的私鑰
- listenport: 監聽udp埠號
- statepassword: Guest API 的密碼
- loglevel: 參考 README_zh.md
- repushconfiginterval: 重新push
UpdateXXX的間格 - passwords: HTTP API 密碼
- showstate: 節點資訊
- addpeer: 新增peer
- delpeer: 刪除peer
- graphrecalculatesetting:
- jittertolerance: 抖動容許誤差,收到Pong以後,一個37ms,一個39ms,不會觸發重新計算
- jittertolerancemultiplier: 一樣是抖動容許誤差,但是高ping的話允許更多誤差
https://www.desmos.com/calculator/raoti16r5n - nodereporttimeout: 收到的
Pong封包的有效期限。太久沒收到就變回Infinity - recalculatecooldown: Floyd-Warshal是O(n^3)時間複雜度,不能太頻繁計算。設個冷卻時間
- edgetemplate: 給
addpeerAPI用的。參考這個設定檔,顯示一個範例設定檔給edge - peers: Peer列表,參考 README_zh.md
- nodeid: Peer的節點ID
- name: Peer名稱(顯示在前端)
- pubkey: peer 公鑰
- pskey: preshared key 該peer和本Supernode連線的PSK
執行此範例設定檔(請開三個terminal):
./etherguard-go -config example_config/super_mode/s1.yaml -mode super
./etherguard-go -config example_config/super_mode/n1.yaml -mode edge
./etherguard-go -config example_config/super_mode/n2.yaml -mode edge
因為是stdio模式,stdin會讀入VPN網路
請在其中一個edge視窗中鍵入
b1aaaaaaaaaa
b1會被轉換成 12byte 的layer 2 header,b是廣播地址FF:FF:FF:FF:FF:FF,1是普通地址AA:BB:CC:DD:EE:01,aaaaaaaaaa是後面的payload,然後再丟入VPN
此時應該要能夠在另一個視窗上看見字串b1aaaaaaaaaa。前12byte被轉換回來了
V4 V6 兩個公鑰
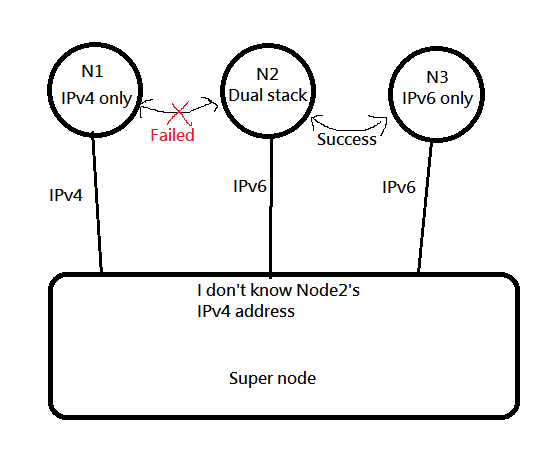
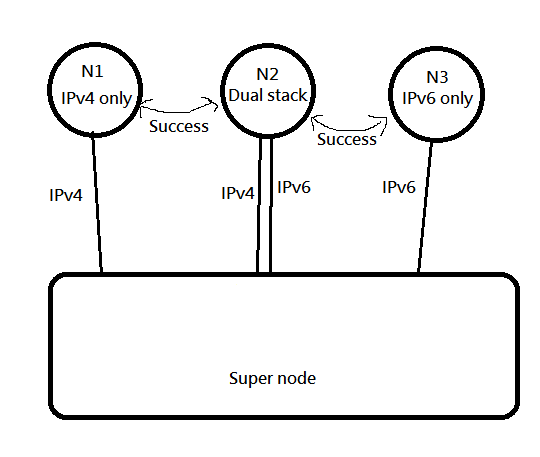
為什麼要分開IPv4和IPv6呢?
因為有這種情況:
這樣的話SuperNode就不知道Node02的ipv4地址,就不能幫助Node1和Node2打洞了
所以要像這樣,V4和V6都建立一條通道,才能讓V4和V6同時都被處理到
打洞可行性
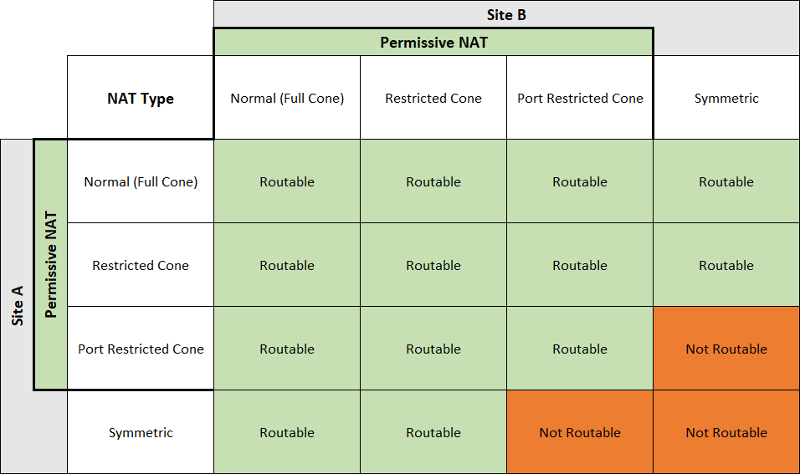
對於不同的NAT type,打洞的可行性可以參考這張圖(出處)
還有,就算雙方都是ConeNAT,也不保證100%成功。
還得看NAT設備的支援情況,詳見此文,裡面3.5章節描述的情況,也無法打洞成功
Relay node
因為Etherguard的Supernode單純只負責幫忙打洞+計算Floyd-Warshall,並分發運算結果
而他本身並不參與資料轉發。因此如上章節描述打洞失敗,且沒有任何可達路徑的話,就需要搭建relay node
基本上任意一個節點有公網ip,就不用擔心沒有路徑可達了。但是還是說明一下
Relay node其實也是一個edge node,只不過被設定成為interface=dummy,不串接任何真實接口
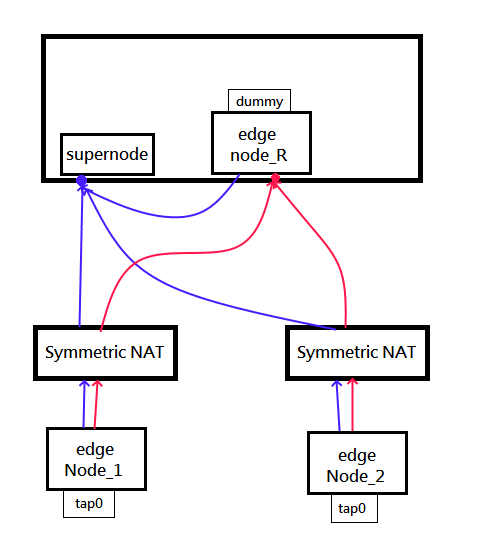
只是在設定時要注意,Supernode地只要設定成Supernode的外網ip。
因為如果用127.0.0.1連接supernode,supernode看到封包的src IP就是127.0.0.1,就會把127.0.0.1分發給Node_1和Node_2
Node_1和Node_2看到Node_R的連線地址是127.0.0.1,就連不上了
看完本章捷,接下來你就能了解一下P2P Mode的運作
