About
git-flow는 Vincent Driessen의 브랜칭 모델을 위한 고수준 저장소 작업을 제공하는 git의 확장입니다. more
★ ★ ★
이 치트 시트는 기본적인 사용법과 git-flow 작업의 효과를 보여줍니다.
★ ★ ★
Basic tips
- Git flow는 훌륭한 명령행 도움말과 출력을 제공합니다. 무슨 일이 일어나는지를 알려면 출력을 주의깊게 읽어주세요.
- macOS/Window Client Sourcetree는 훌륭한 git gui를 제공하고 git-flow에 대한 지원을 제공합니다.
- Git-flow는 병합(merge) 기반의 솔루션입니다. feature 브랜치를 리베이스(rebase)하지 않습니다.
★ ★ ★
Setup
- 사전에 제대로 동작하는 git이 설치되어 있어야합니다.
- Git flow는 macOS, Linux, Windows에서 동작합니다.
★ ★ ★
macOS
Homebrew$ brew install git-flow-avhMacports
$ port install git-flow-avh
Linux
$ apt-get install git-flow
Windows (Cygwin)
$ wget -q -O - --no-check-certificate https://raw.github.com/petervanderdoes/gitflow-avh/develop/contrib/gitflow-installer.sh install stable | bash
git-flow의 설치를 위해서는 wget과 util-linux가 필요합니다.
상세한 git flow의 설치 방법은 git flow wiki를 참고하세요.

Getting started
Git flow는 프로젝트 설정을 변경하기 위해 초기화를 필요로 합니다.
★ ★ ★
초기화
기존 git 저장소 내에서 초기화하는 것으로 git-flow의 사용을 시작합니다.
git flow init
몇몇 질문에 대답해서 브랜치의 명명규칙을 정합니다. 기본 값을 사용하기를 권장합니다.
Features
- 다가오는 배포(release)를 위한 새 기능(feature)을 개발합니다.
- 일반적으로 개발자의 저장소에만 존재합니다.
★ ★ ★
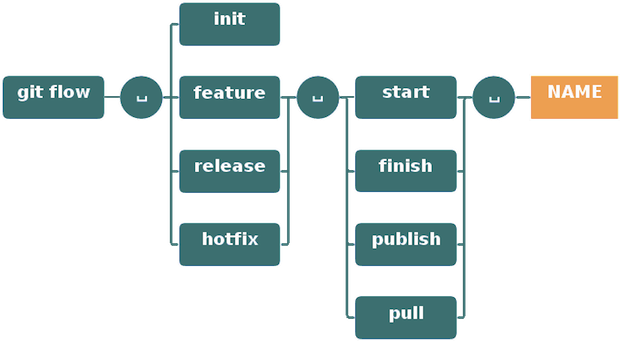
새 기능(feature) 시작하기
새 기능의 개발은 'develop' 브랜치에서 시작합니다.
다음과 같이 새 기능의 개발을 시작합니다.
git flow feature start MYFEATURE
이것은 'develop'에 기반한 새 기능(feature) 브랜치를 생성하고 그 브랜치로 전환합니다.
기능 완료
기능 개발을 완료합니다. 이것은 다음 작업들을 수행합니다.
- MYFEATURE 브랜치를 'develop'에 병합(merge)합니다.
- 기능 브랜치를 삭제합니다.
- 'develop' 브랜치로 전환합니다.
git flow feature finish MYFEATURE
기능을 게시(publish)
기능을 공동으로 개발하고 있나요?
기능을 원격 서버에 게시하여 다른 사용자들도 사용할 수 있게 합니다.
git flow feature publish MYFEATURE
게시된 기능 가져오기
다른 사용자가 게시한 기능을 가져옵니다.
git flow feature pull origin MYFEATURE
Make a release
- 새로운 제품 출시 준비를 지원합니다.
- 출시를 위한 사소한 버그 수정이나, 메타 데이터 준비를 허용합니다.
★ ★ ★
릴리스 시작
릴리스를 시작하려면 git flow의 release 명령을 사용합니다.
'develop' 브랜치로부터 'release' 브랜치를 생성합니다.
git flow release start RELEASE [BASE]
릴리스를 시작할 [BASE] commit sha-1 해시를 선택적으로 줄 수도 있습니다. 그 commit은 반드시 'develop' 브랜치에 있어야합니다.
★ ★ ★
릴리스 브랜치를 생성한 후에는 다른 개발자들의 릴리스 commit을 허용하기위해 게시(publish)하는 것이 현명합니다. 기능 게시와 비슷한 방법으로합니다.
git flow release publish RELEASE
(원격 'release' 브랜치의 변경 추적은 다음과 같이 합니다git flow release track RELEASE )
릴리스 완료
릴리스 완료는 git 브랜치하기에서 가장 큰 단계입니다. 몇몇 작업을 수행합니다.
- 'release' 브랜치를 'master' 브랜치에 병합(merge)
- 릴리스를 릴리스 이름으로 태그(tag)
- 릴리스를 'develop' 브랜치로 재병합(back-merge)
- 'release' 브랜치 삭제
git flow release finish RELEASE
git push --tags를 사용해 태그들을 push하는 것을 잊지마세요.
Hotfixes
- 핫픽스는 현재 출시된 제품에 문제가 생겨서 즉각 대응해야하는 상황에서 필요합니다.
- 'master' 브랜치의 현재 출시된 버전으로 표기(mark)된 태그(tag)로부터 브랜치를 땁니다.
★ ★ ★
핫픽스 시작
여타 git flow 명령과 비슷한 방법으로 시작합니다.
git flow hotfix start VERSION [BASENAME]
여기서 버전 인수는 핫픽스 릴리스 이름을 지정합니다.
선택적으로 basename으로 시작점을 지정할 수도 있습니다.
핫픽스 완료
핫픽스를 종료하면 핫픽스는 'develop' 및 'master' 브랜치로 병합(merge)됩니다.
추가적으로 'master'의 병합 부분은 핫픽스 버전으로 태그됩니다.
git flow hotfix finish VERSION
Backlog
★ ★ ★
- 여기서는 모든 명령을 다루지 않았습니다. 중요한 것들만 설명했습니다.
- git 명령도 사용할 수 있습니다. git flow는 단지 도구 모음일 뿐입니다.
- 'support' 기능은 아직 베타 버전입니다. 사용은 권장되지 않습니다.
- 번역해주신다면 저는 행복하게 통합할 것입니다.
★ ★ ★