| wg_meshconf | ||
| .gitignore | ||
| CHANGELOG.md | ||
| CONTRIBUTING.md | ||
| LICENSE | ||
| README.md | ||
| setup.py | ||
wg-meshconf
On the Horizon: wg-dynamic
wg-dynamic is a tool designed officially by the WireGuard developing team. This new utility will provide a convenient way of configuring networks dynamically, where mesh network being one of the them. If you're interested, check it out at wg-dynamic@github or wg-dynamic@official repository.
Version 2.0.0
Say hello to version 2.0.0! This version is a complete rewrite of the pervious versions. Detailed information can be found in the changelog. Please tell me if you like or hate this new design by posting an issue.
Introduction
wg-meshconf is a tool that will help you to generate peer configuration files for WireGuard mesh networks. You can easily and quickly create WireGuard mesh networks using this tool.
Prerequisites
- Python 3
- prettytable (optional)
It is highly recommended to install prettytable so you can get beautiful tabular display of peer information. If you choose not to install prettytable, only plaintext output will be available.
Installation (pip)
wg-meshconf is available on PyPI. You can install it with pip and run the program via the wg-meshconf command.
# installing the program with pip
pip3 install --user -U wg-meshconf

# running the program
wg-meshconf showpeers
Installation (Manual)
Alternatively, if you do not want to install the program into the system with pip, you can clone this repository using git or download the master branch's ZIP file.
# cloning the repository with git
git clone https://github.com/k4yt3x/wg-meshconf.git

# download the master branch's ZIP file
wget https://github.com/k4yt3x/wg-meshconf/archive/master.zip

# decompress the ZIP file
unzip wg-meshconf-master.zip
Then, you will need to install Python's dependencies.
# if you cloned this repository
pip3 install --user -Ur wg-meshconf/wg_meshconf/requirements.txt

# if you downloaded and decompressed the zip file
pip3 install --user -Ur wg-meshconf-master/wg_meshconf/requirements.txt
Learn by an Example
Usages are dull and boring. Let's see a real-life example of how this tool can be used. This section will demonstrate how to create a simple mesh network with four nodes using wg-meshconf.
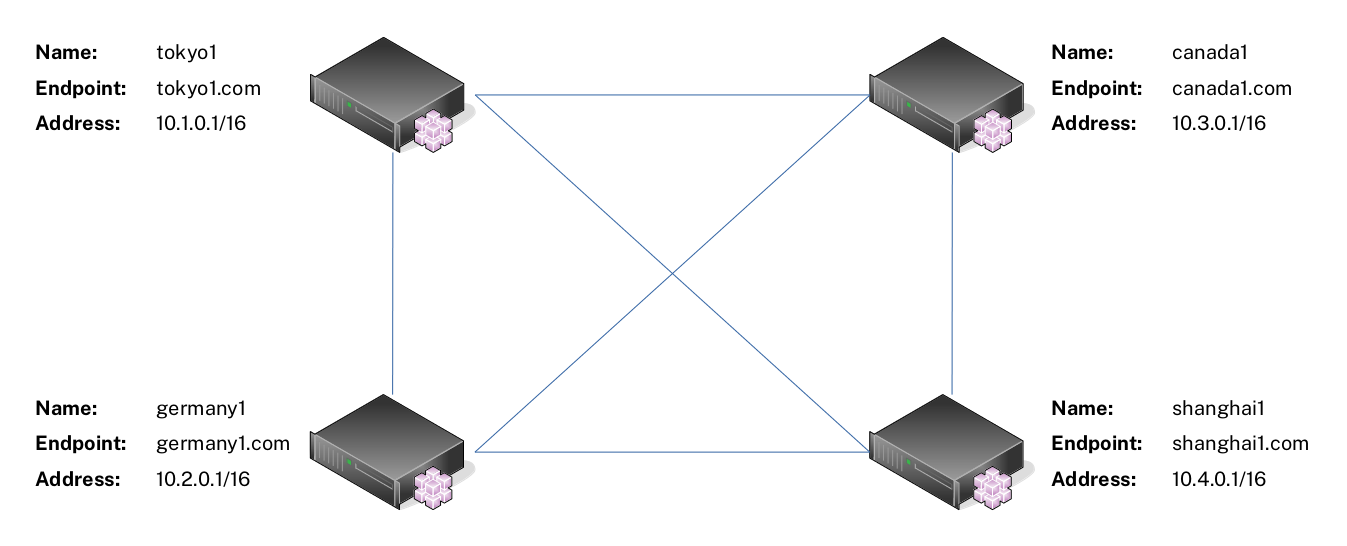
For this example, suppose you have four servers as shown below. These servers can reach each other via the Endpoint address. For instance, server tokyo1 can ping server shanghai1 with the address shanghai1.com.
Step 1: Add Peers
First we need to add all peers in the mesh network into the database. The basic syntax for adding new peers is:
wg-meshconf addpeer NAME --address IP_ADDRESS --address IP_ADDRESS_2 --endpoint ENDPOINT
- New private key will be generated automatically if unspecified
- ListenPort defaults to 51820 per WireGuard standard
- All other values are left empty by default
There are more options which you can specify. Use the command wg-meshconf addpeer -h for more details.
After adding all the peers into the database, you can verify that they have all been added correctly via the wg-meshconf showpeers command. The simplify switch here omits all columns with only Nones.
Step 2: Export Configuration Files
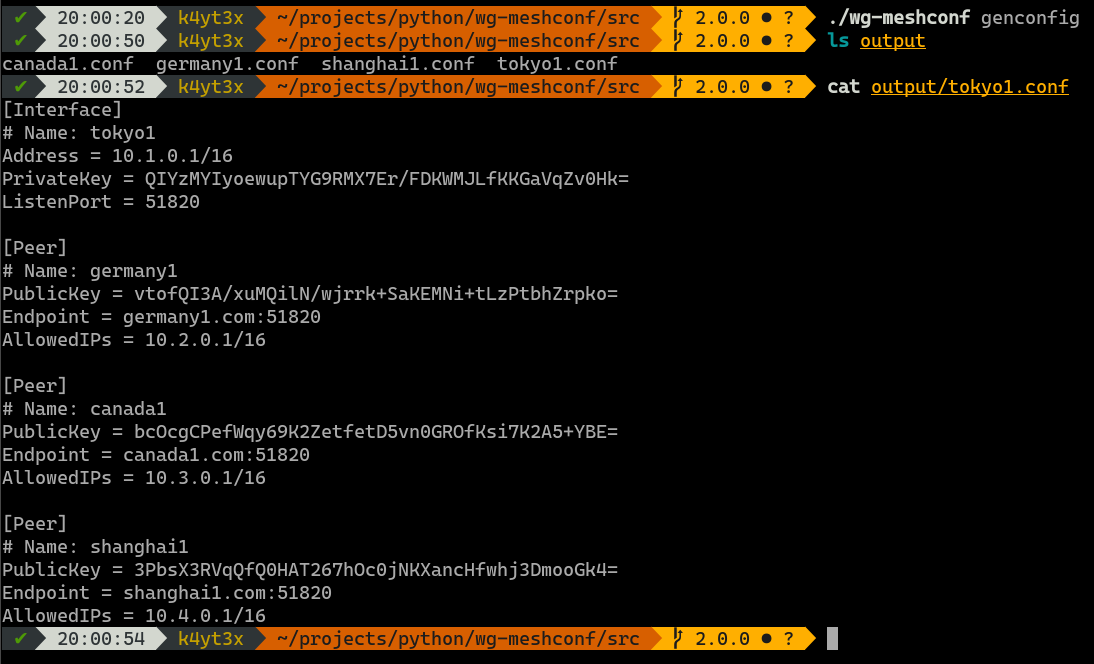
Use the genconfig command to generate configuration files for all peers. You may also export configurations for only one peer by specifying the peer's name.
The configuration files will be named after the peers' names. By default, all configuration files are exported into a subdirectory named output. You can change this by specifying output directory using the -o or the --output option.
Step 3: Copy Configuration Files to Peers
Copy each of the configuration files to the corresponding peers.
Step 4: Start WireGuard Services
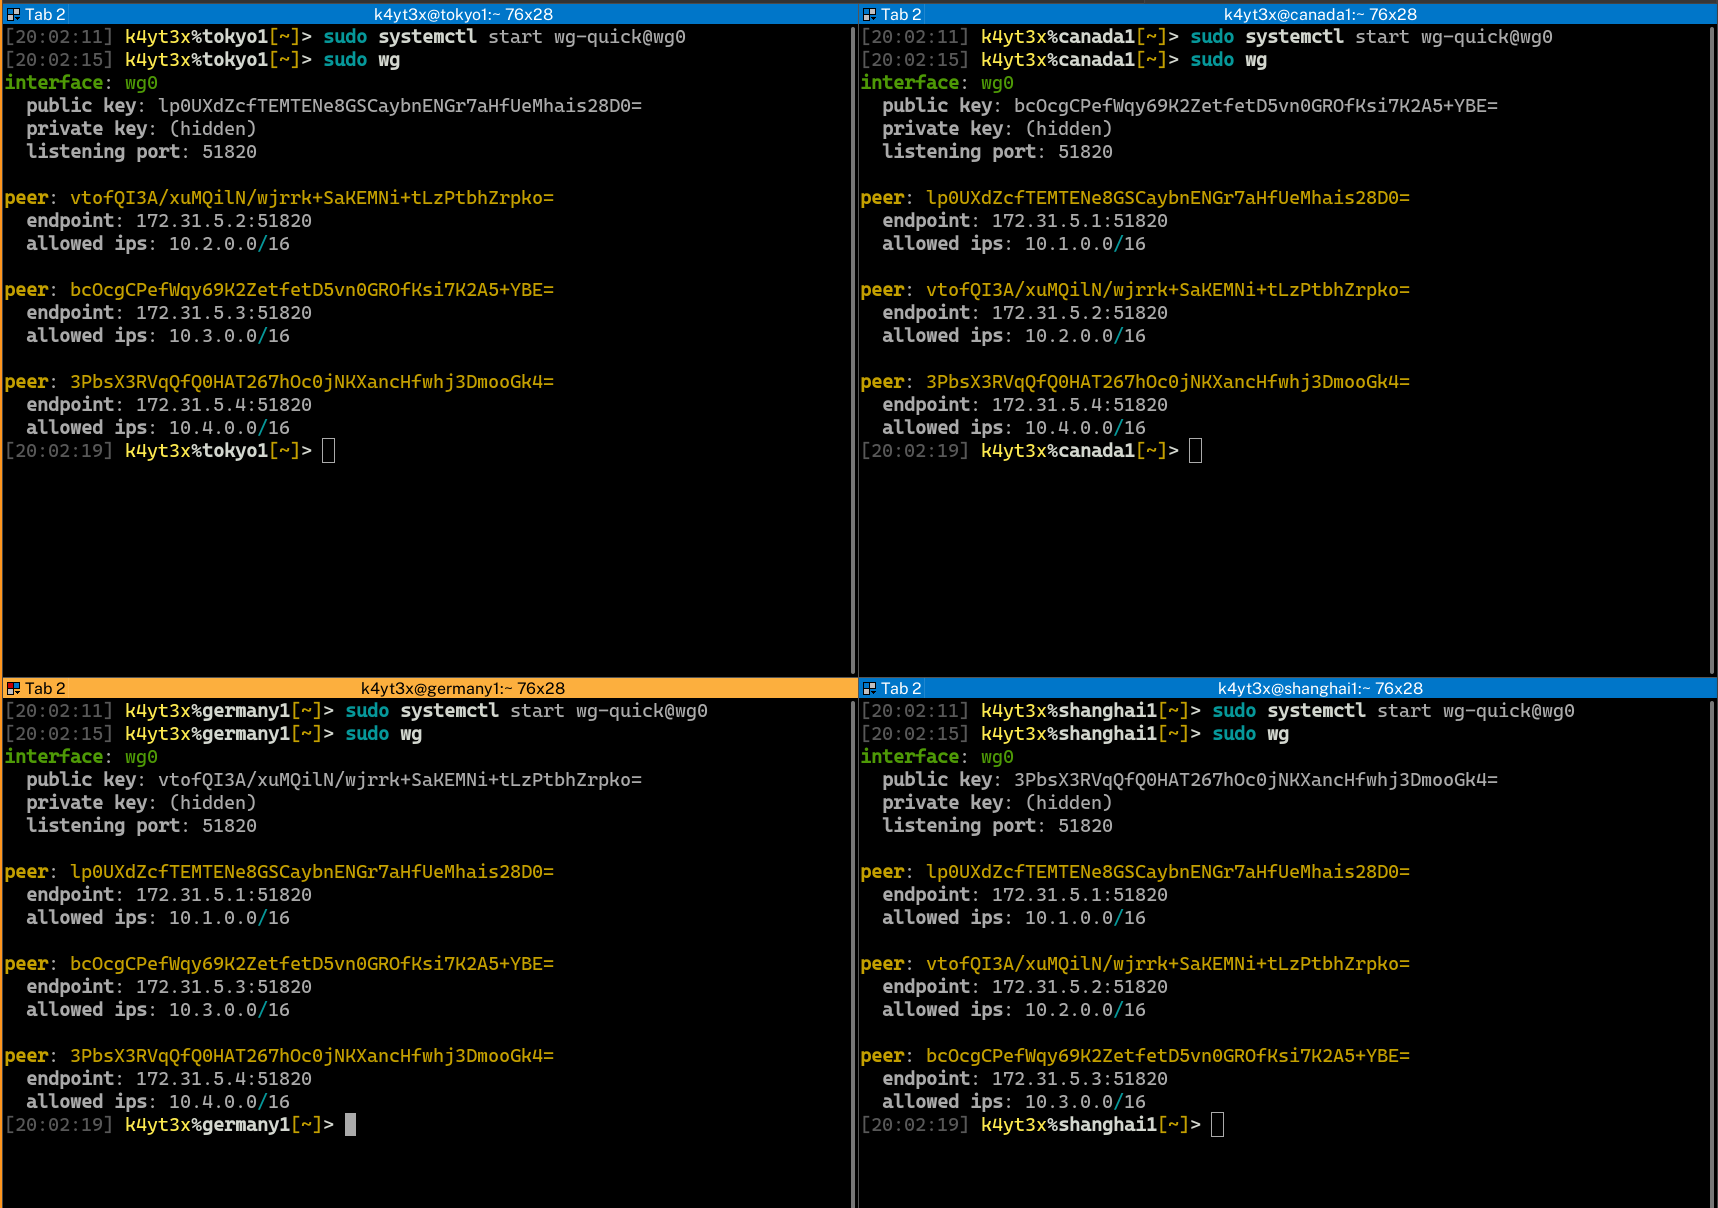
Start up the WireGuard interfaces using the wg-quick command. It is also possible to control WireGuard interfaces via WireGuard's wg-quick@ systemd service. WireGuard status can be verified via the wg command after WireGuard interfaces are set up.
Step 5: Verify Connectivity
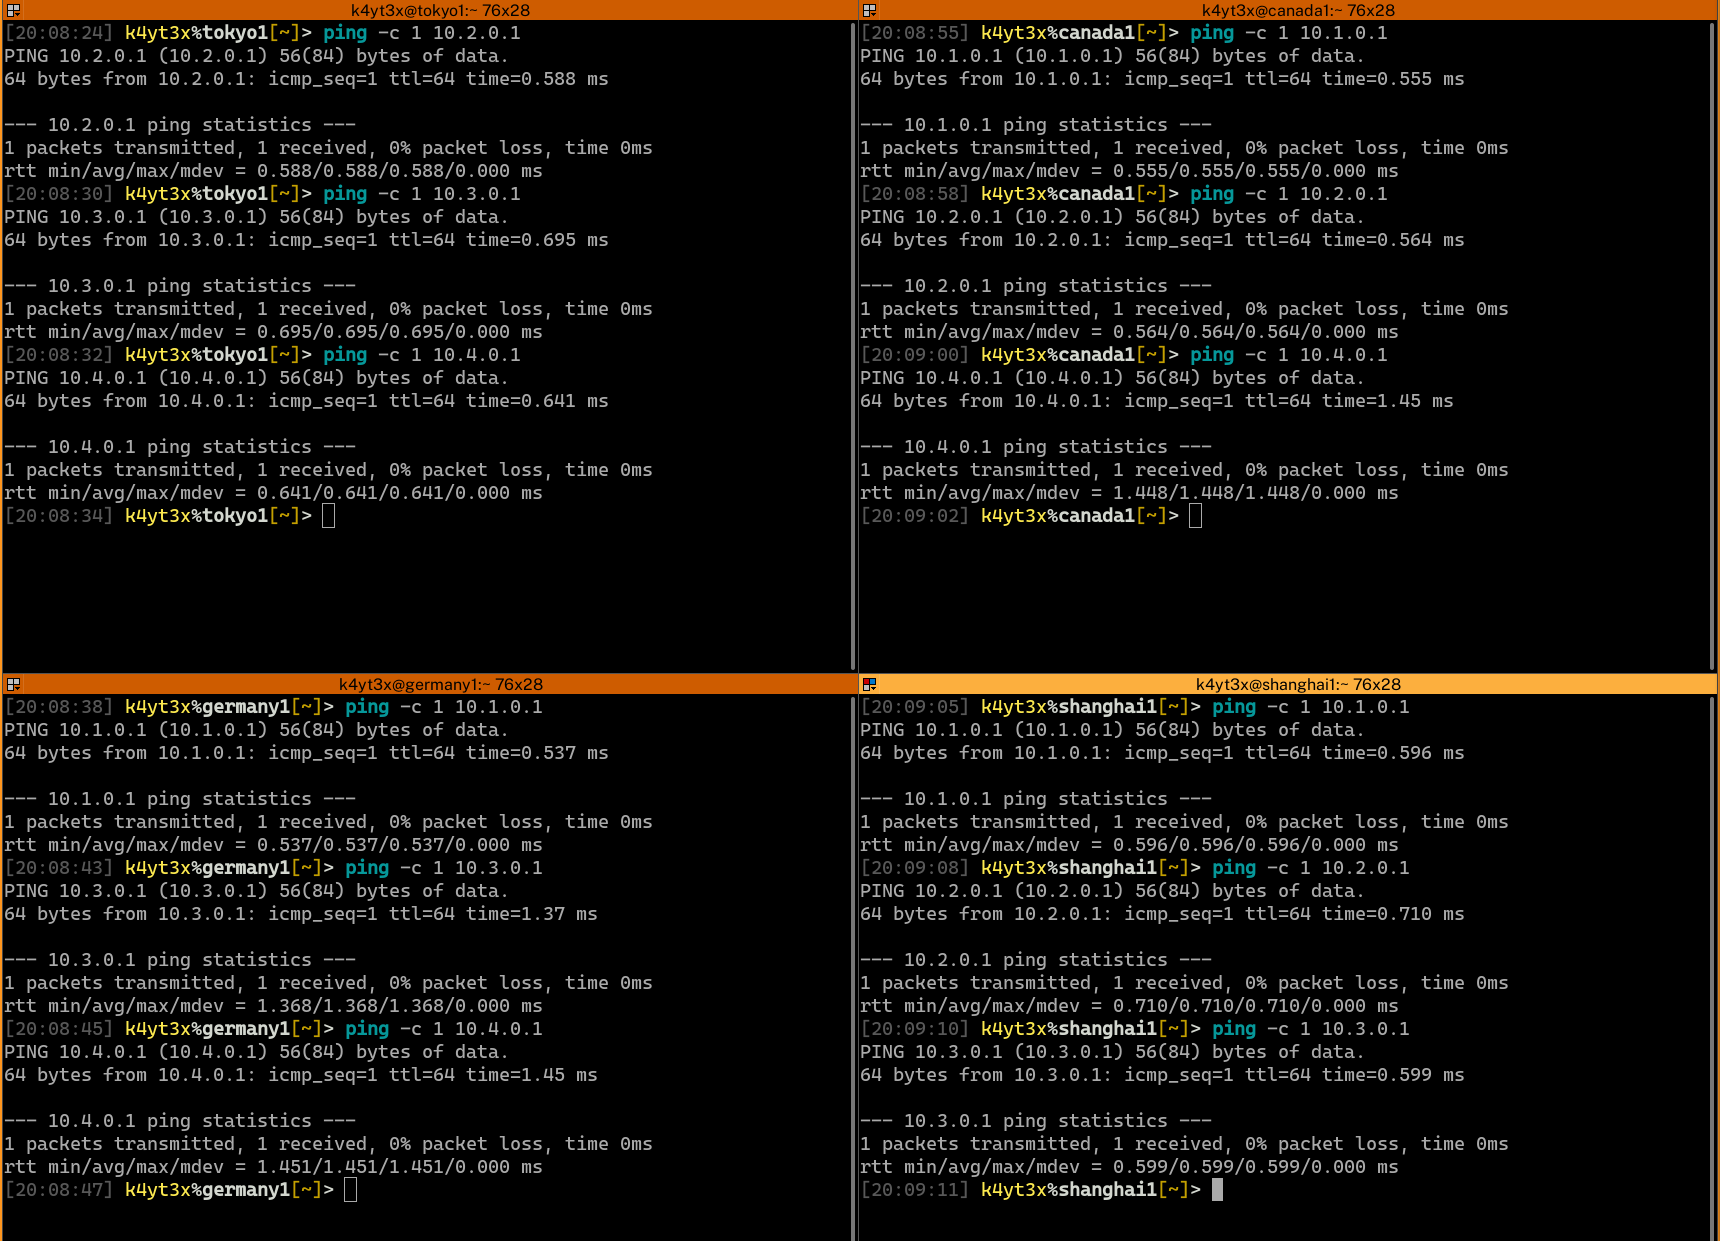
Verify that all endpoints have been configured properly and can connect to each other.
Done. Now a mesh network has been created between the four servers.
Updating Peer Information
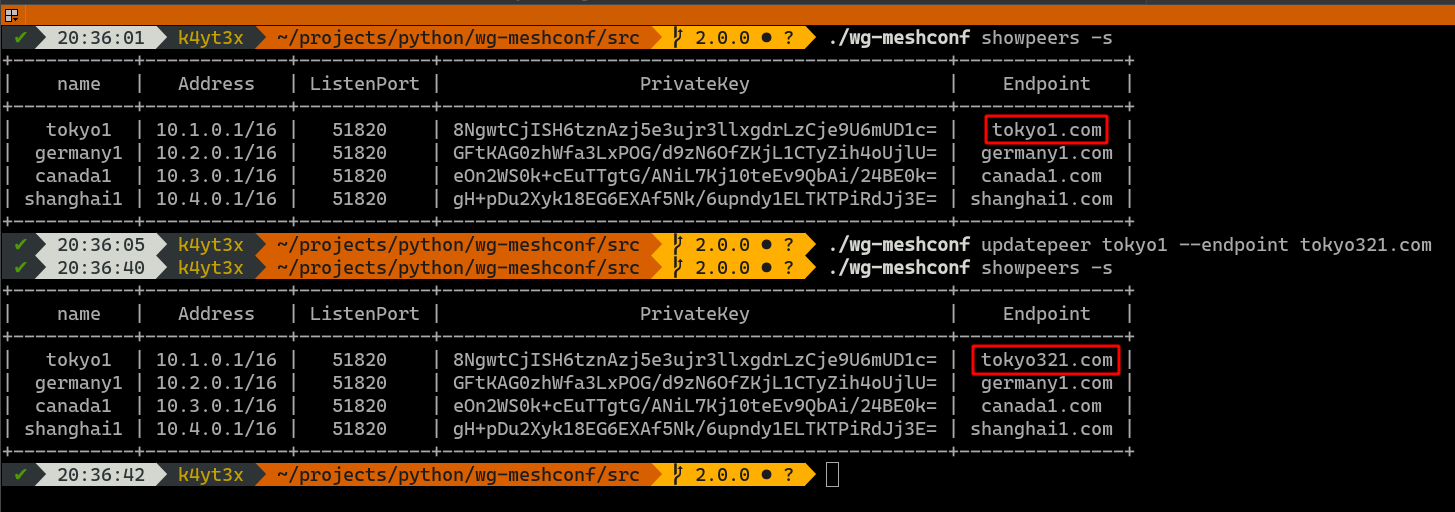
If you would like to update a peer's information, use the updatepeer command. The syntax of updatepeer is the same as that of the addpeer command. Instead of adding a new peer, this command overwrites values in existing entries.
In the example below, suppose you would like to update tokyo1's endpoint address and change it to tokyo321.com. Use the updatepeer command and specify the new endpoint to be tokyo321.com. This will overwrite tokyo1's existing Endpoint value.
Show Peer Information
The showpeers command prints all peers' information by default.
Now that's a lot of info and a lot of unnecessary columns which only have Nones. Therefore, I added the -s/--simplify command which omits those useless columns.
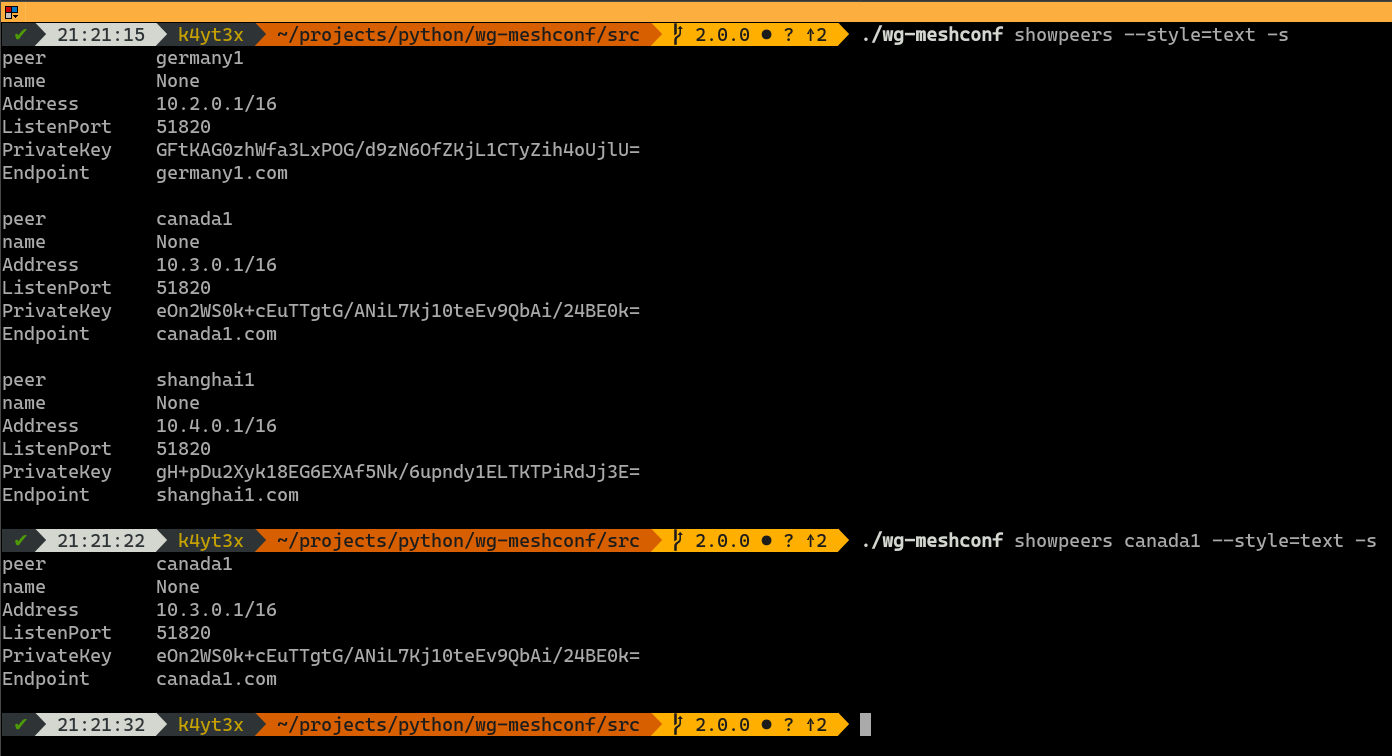
You may also query information about a specific peer.
Plaintext mode has a similar usage. It's just a bit harder to read, at least for me.
Deleting Peers
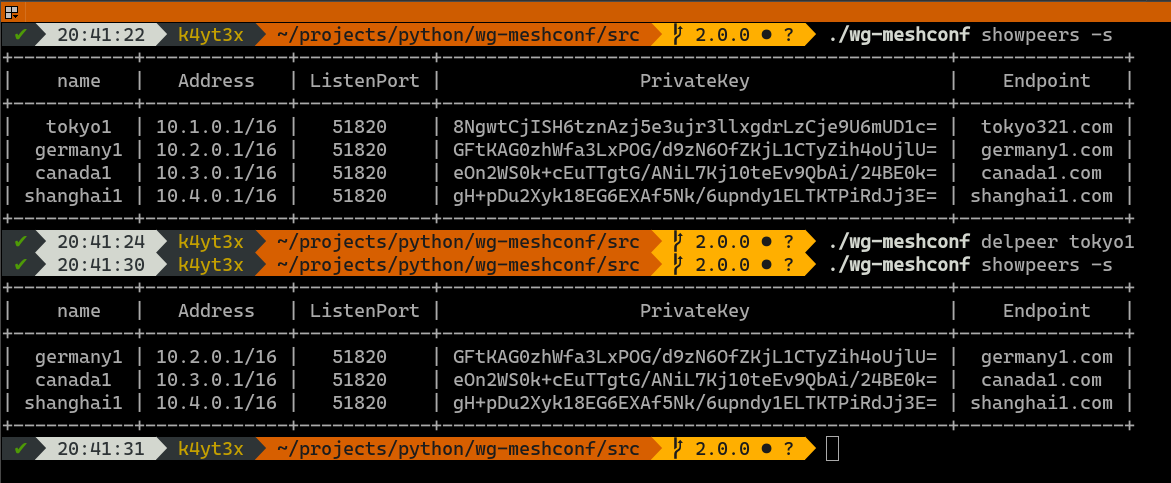
Use the delpeer command to delete peers. The syntax is delpeer PEER_NAME.
This example below shows how to delete the peer tokyo1 from the database.
Database Files
Unlike 1.x.x versions of wg-meshconf, version 2.0.0 does not require the user to save or load profiles. Instead, all add peer, update peer and delete peer operations are file operations. The changes will be saved to the database file immediately. The database file to use can be specified via the -d or the --database option. If no database file is specified, database.json will be used.
Database files are essentially just JSON files. Below is an example.
{
    "peers": {
        "tokyo1": {
            "PrivateKey": "8NgwtCjISH6tznAzj5e3ujr3llxgdrLzCje9U6mUD1c=",
            "Address": [
                "10.1.0.1/16"
            ],
            "ListenPort": 51820,
            "Endpoint": "tokyo1.com"
        },
        "germany1": {
            "PrivateKey": "GFtKAG0zhWfa3LxPOG/d9zN6OfZKjL1CTyZih4oUjlU=",
            "Address": [
                "10.2.0.1/16"
            ],
            "ListenPort": 51820,
            "Endpoint": "germany1.com"
        }
    }
}
Detailed Usages
You may refer to the program's help page for usages. Use the -h switch or the --help switch to print the help page.
$ wg-meshconf -h
usage: wg-meshconf [-h] [-d DATABASE] {addpeer,updatepeer,delpeer,showpeers,genconfig} ...

positional arguments:
  {addpeer,updatepeer,delpeer,showpeers,genconfig}

optional arguments:
  -h, --help            show this help message and exit
  -d DATABASE, --database DATABASE
                        path where the database file is stored (default: database.json)
Specify -h or --help after a command to see this command's usages.
$ wg-meshconf addpeer -h
usage: wg-meshconf addpeer [-h] --address ADDRESS [--endpoint ENDPOINT] [--privatekey PRIVATEKEY] [--listenport LISTENPORT] [--fwmark FWMARK] [--dns DNS] [--mtu MTU] [--table TABLE] [--preup PREUP] [--postup POSTUP] [--predown PREDOWN] [--postdown POSTDOWN] [--saveconfig] name

positional arguments:
  name                  Name used to identify this node

optional arguments:
  -h, --help            show this help message and exit
  --address ADDRESS     address of the server
  --endpoint ENDPOINT   peer's public endpoint address
  --privatekey PRIVATEKEY
                        private key of server interface
  --listenport LISTENPORT
                        port to listen on
  --fwmark FWMARK       fwmark for outgoing packets
  --dns DNS             server interface DNS servers
  --mtu MTU             server interface MTU
  --table TABLE         server routing table
  --preup PREUP         command to run before interface is up
  --postup POSTUP       command to run after interface is up
  --predown PREDOWN     command to run before interface is down
  --postdown POSTDOWN   command to run after interface is down
  --saveconfig          save server interface to config upon shutdown
License
Licensed under the GNU General Public License Version 3 (GNU GPL v3)
https://www.gnu.org/licenses/gpl-3.0.txt
(C) 2018-2021 K4YT3X
Credits
This project relies on the following software and projects.
