5.4 KiB
Etherguard
Static Mode的範例配置檔的說明文件
Static Mode
沒有自動選路,沒有握手伺服器
十分類似原本的wireguard,一切都要提前配置好
但是除了peer以外,還要額外配置轉發表,所有人共用一份轉發表
設定檔裡面的nexthoptable部分,只有此模式會生效
這個模式下,不存在任何的Control Message,斷線偵測甚麼的也不會有
請務必保持提前定義好的拓樸。不然如果存在中轉,中轉節點斷了,部分連線就會中斷
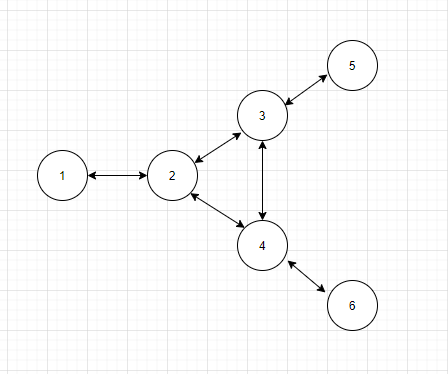
這份範例配置檔的網路拓樸如圖所示
發出封包時,會設定起始ID=自己的Node ID,終點ID則是看Dst Mac Address。
如果Dst MacAddr是廣播地址,或是不在自己的對應表裡面,就會設定終點=Boardcast
收到封包的時候,如果dst==自己ID,就會收下,不轉給任何人。
同時還會看它的 Src Mac Address 和 Src NodeID ,並加入對應表
這樣下次傳給他就可以直接傳給目標,而不用廣播給全節點了
所以設定檔中的轉發表如下表。格式是yaml的巢狀dictionary
轉發/發送封包時,直接查詢 NhTable[起點][終點]=下一跳
就知道下面一個封包要轉給誰了
nexthoptable:
  1:
    2: 2
    3: 2
    4: 2
    5: 2
    6: 2
  2:
    1: 1
    3: 3
    4: 4
    5: 3
    6: 4
  3:
    1: 2
    2: 2
    4: 4
    5: 5
    6: 4
  4:
    1: 2
    2: 2
    3: 3
    5: 3
    6: 6
  5:
    1: 3
    2: 3
    3: 3
    4: 3
    6: 3
  6:
    1: 4
    2: 4
    3: 4
    4: 4
    5: 4
Boardcast
比較特別的是終點ID=Boardcast的情況。
假設今天的狀況:我是4號,我收到起點ID = 1,終點ID=boardcast的封包
我應該只轉給6號就好,而不會轉給3號。
因為3號會收到來自2號的封包,自己就不用重複遞送了
因此我有設計,如果終點ID = Boardcast,就會檢查Src到自己的所有鄰居,會不會經過自己
1 -> 6 會經過自己: [1 2 4 6]
1 -> 3 不會: [1 2 3]
2號是封包來源跳過檢查
就能知道我應該把封包轉送給6號,而不轉送給3號
小工具
如果懶的手算轉發表,本工具也能幫你算算
請先準備好一個txt檔,就叫他path.txt吧
標記任2節點之間的單向延遲。Inf代表不可直連
X 1   2   3   4   5   6
1 0   0.5 Inf Inf Inf Inf
2 0.5 0   0.5 0.5 Inf Inf
3 Inf 0.5 0   0.5 0.5 Inf
4 Inf 0.5 0.5 0   Inf 0.5
5 Inf Inf 0.5 Inf 0   Inf
6 Inf Inf Inf 0.5 Inf 0
之後用這個指令就能輸出用Floyd Warshall算好的轉發表了,填入設定檔即可
./etherguard-go -config example_config/static_mode/path.txt -mode slove

NextHopTable:
  1:
    2: 2
    3: 2
    4: 2
    5: 2
    6: 2
  2:
    1: 1
    3: 3
    4: 4
    5: 3
    6: 4
  3:
    1: 2
    2: 2
    4: 4
    5: 5
    6: 4
  4:
    1: 2
    2: 2
    3: 3
    5: 3
    6: 6
  5:
    1: 3
    2: 3
    3: 3
    4: 3
    6: 3
  6:
    1: 4
    2: 4
    3: 4
    4: 4
    5: 4
程式還會額外輸出一些資訊,像是路徑表。
會標示所有的起點終點組合的封包路徑,還有行經距離
Human readable:
src     dist            path
1 -> 2  0.500000        [1 2]
1 -> 3  1.000000        [1 2 3]
1 -> 4  1.000000        [1 2 4]
1 -> 5  1.500000        [1 2 3 5]
1 -> 6  1.500000        [1 2 4 6]
2 -> 1  0.500000        [2 1]
2 -> 3  0.500000        [2 3]
2 -> 4  0.500000        [2 4]
2 -> 5  1.000000        [2 3 5]
2 -> 6  1.000000        [2 4 6]
3 -> 1  1.000000        [3 2 1]
3 -> 2  0.500000        [3 2]
3 -> 4  0.500000        [3 4]
3 -> 5  0.500000        [3 5]
3 -> 6  1.000000        [3 4 6]
4 -> 1  1.000000        [4 2 1]
4 -> 2  0.500000        [4 2]
4 -> 3  0.500000        [4 3]
4 -> 5  1.000000        [4 3 5]
4 -> 6  0.500000        [4 6]
5 -> 1  1.500000        [5 3 2 1]
5 -> 2  1.000000        [5 3 2]
5 -> 3  0.500000        [5 3]
5 -> 4  1.000000        [5 3 4]
5 -> 6  1.500000        [5 3 4 6]
6 -> 1  1.500000        [6 4 2 1]
6 -> 2  1.000000        [6 4 2]
6 -> 3  1.000000        [6 4 3]
6 -> 4  0.500000        [6 4]
6 -> 5  1.500000        [6 4 3 5]
Quick start
Run example config
在不同terminal分別執行以下命令
./etherguard-go -config example_config/super_mode/n1.yaml -mode edge
./etherguard-go -config example_config/super_mode/n2.yaml -mode edge
./etherguard-go -config example_config/super_mode/n3.yaml -mode edge
./etherguard-go -config example_config/super_mode/n4.yaml -mode edge
./etherguard-go -config example_config/super_mode/n5.yaml -mode edge
./etherguard-go -config example_config/super_mode/n6.yaml -mode edge
因為本範例配置是stdio的kbdbg模式,stdin會讀入VPN網路
請在其中一個edge視窗中鍵入
b1message
因為l2headermode是kbdbg,所以b1會被轉換成 12byte 的layer 2 header,b是廣播地址FF:FF:FF:FF:FF:FF,1是普通地址AA:BB:CC:DD:EE:01,message是後面的payload,然後再丟入VPN
此時應該要能夠在另一個視窗上看見字串b1message。前12byte被轉換回來了
Run your own etherguard
要正式使用,請將itype改成tap,並且修改各節點的公鑰私鑰和連線地址
再關閉不必要的log增加性能,最後部屬到不同節點即可
