| docker-compose-joplin-only.yml | ||
| docker-compose.yml | ||
| LICENSE | ||
| README.md | ||
joplin-vieweb
A simple web viewer for Joplin notes.
*If it's useful for you, you may consider to  *
*
Purpose
I'm going to use Joplin as a notes application.
It's a long time I wanted for something like Joplin: opensource, not coupled to a web giant, and without infinite storage: storage has a price, we should pay for it.
Joplin-vieweb purpose is to provide an online view of my Joplin notes.
It's running on a "Django server", running beside Joplin terminal app.
Screenshot
Contact
I you want to discuss, ask, suggest... Please:
- Input an issue, or
- start a discussion on github, or
- post on discord
Features and not(-yet?) features
Yes it does ❤
-
Protect joplin-vieweb access by login (see here how to logout)
-
Display notebooks, and notes
- images
- attachments
-
Display todo:
-
search for notes
-
code syntax highlight
-
Add a table of content if note contains headers
-
Display tags, and notes linked.
-
Joplin sync:
-
Tag edition: add / remove / create tags in notes:
 Once tags edited, a little reminder not to forget to synchronize Joplin:

-
Checkbox list changes can be saved to notes.
-
Note edition / deletion, with support of image paste, and image / attachment drag&drop.

- Note creation

- Notebook edition: create / rename / delete

- Notes history: list of the latest notes consulted, to be able to open them quickly, or pin them:

- Tabs in notes (not displayed in joplin applications). Syntax here.

- Hyperlink preview in notes, on mouse hover:

- Render KaTeX:

No it doesn't (yet?) 💔
- Sort notebooks nor notes
- Move note or notebook from one notebook to another.
Installation / configuration instructions
! Only linux systems are supported
! Only arm64 and amd64 architectures
! For raspberry users (I am): use 64 bits OS
Installation
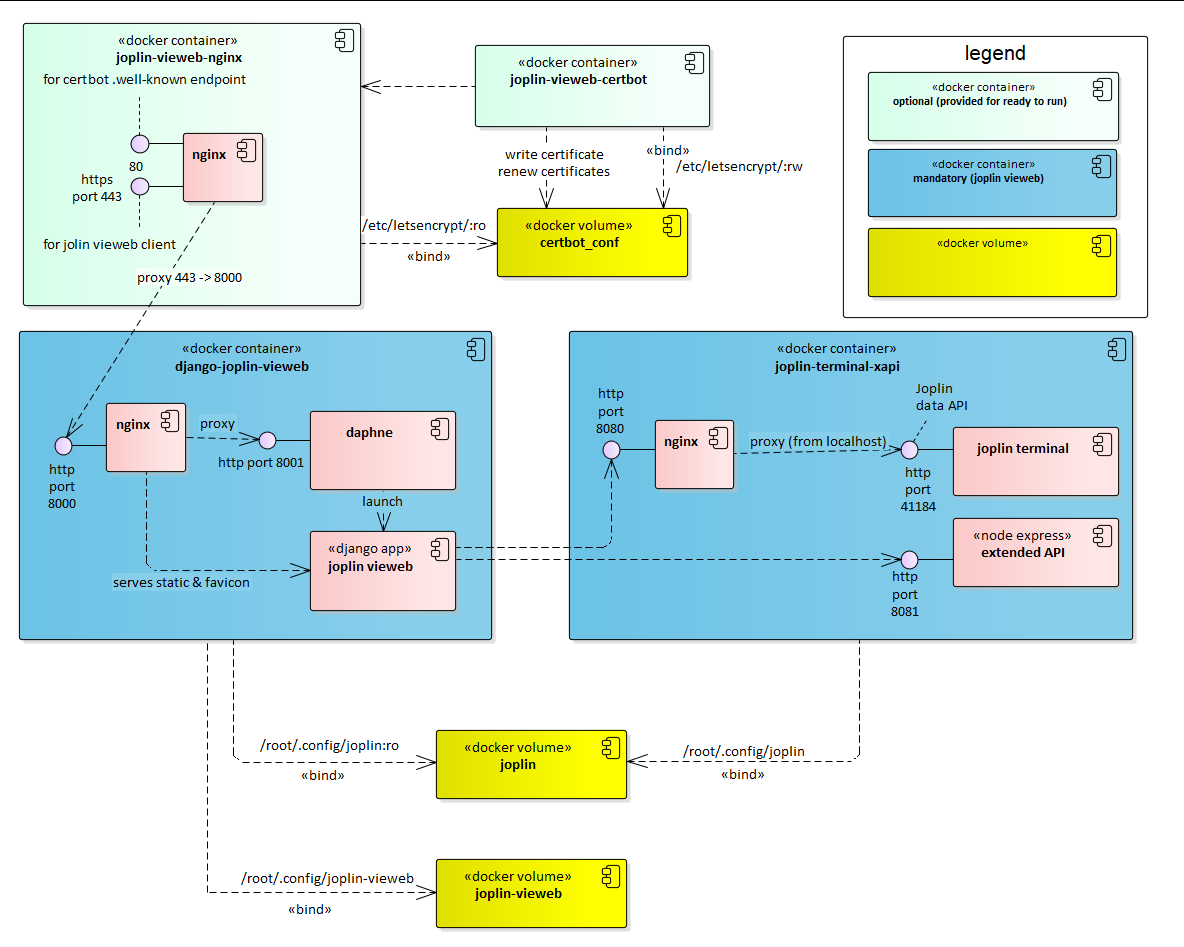
Installation is done with docker-compose. The default docker-compose file installs a nginx server with certbot certificates mechanisms, and listens to ports 80 and 443.
If you have your own server, use docker-compose-joplin-only.yml. Have a look to the containers.
If your server is apache2, have a look to this apache configuration procedure.
- Prerequisites: your linux system has docker and docker-compose installed
- Enable docker service at system startup
- Get docker-compose.yml (either you clone this git repo, or you copy the file somewhere)
- Edit the 4 variables (x-common-variables block) at the top of docker-compose file:
-
ORIGINS: write the domain and/or IP address (only those origins are allowed to access joplin-vieweb)
Exemple:x-common-variables: &common-variables ORIGINS: "'http://localhost:8080', 'http://192.168.21.1:8080'"or
x-common-variables: &common-variables ORIGINS: "'https://your_domain.com', 'https://12.34.56.78'" CERT_DOMAIN: your_domain.com CERT_MAIL: you@zaclys.net -
⚠ If you prefer writing the ORIGINS directly in django-joplin-vieweb service environment, do it as follow:
services:
  django-joplin-vieweb:
    environment:
      - ORIGINS='https://your_domain.com', 'https://12.34.56.78'
Note there is no surrounding double quotes (")
-
If you want to protect your notes access by requiring a login, set
JOPLIN_LOGIN_REQUIRED: True. If you don't want the user to log in, setJOPLIN_LOGIN_REQUIRED: False. -
If you use nginx and certbot containers:
- CERT_DOMAIN: your domain so let's encrypt can contact (IP address doesn't work: you need a domain)
- CERT_MAIL: a mail needed by let's encrypt.
-
If you don't use nginx and certbot container (if you use docker-compose-joplin-only.yml):
- Change <PORT-TO-YOUR-PROXY> to fit your proxy setup.
-
- And "run"
sudo systemctl enable docker
cd ~
mkdir joplin-vieweb
cd joplin-vieweb
wget https://raw.githubusercontent.com/joplin-vieweb/joplin-vieweb/main/docker-compose.yml
vi docker-compose.yml # edit the x-common-variables (3 variables)
sudo docker-compose up
Congratulation, the server is running. If the system reboots, the server will start automatically (since we enabled docker.service at startup and the services in odcker-compose are set as "restart")
Upgrade
When a new version is available, simply go to your docker-compose file:
sudo docker-compose down
sudo docker-compose pull
sudo docker-compose up
Configuration and usage
! Users configuration is done from this url: https://your_domain.com/admin/
! Usage url, to access joplin notes: https://your_domain.com/joplin
Users
First you must change admin password:
- login to https://your_domain.com/admin/ (login: admin / password: admin)

- Change the admin password:

- If you want to login to joplin-vieweb with another login than admin: create a user:

- Now you can logout and visit https://your_domain.com/joplin

- Login with admin or your newly created user:

Synchronisation
You should configure a synchronisation to secure your notes:

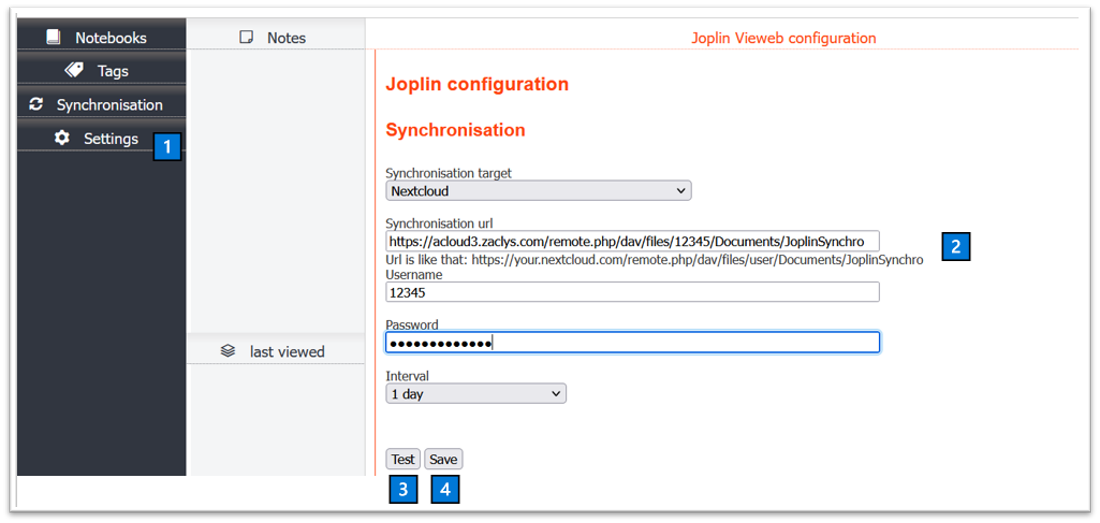
1️⃣ Click the settings tab
2️⃣ Input synchronisation data (only nextcloud, webdav and joplin server are supported for now, if you would like other services, ask in a conversation)
3️⃣ Test
4️⃣ If test result is OK: save
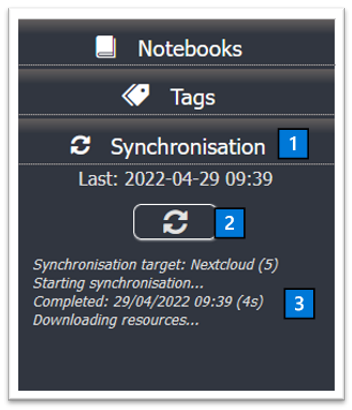
If your cloud already contains joplin content, do a synchronisation:

1️⃣ Click the synchronisation tab
2️⃣ click the sync button
3️⃣ Wait for the sync to finish (it may take a long time depending on your cloud content)
Joplin
You can now access your notebooks: https://your_domain/joplin (⚠ don't forget the /joplin ⚠)
Your reverse proxy: image size
Your reverse proxy probably limits the size of images that can be uploaded, and therefore put in notes.
Don't forget to configure.
For instance, or if you use the one provided, it's configured here.


