joplin-vieweb
A simple web viewer for Joplin notes.
Purpose
I'm going to use Joplin as a notes application.
It's a long time I wanted for something like Joplin: opensource, not coupled to a web giant, and without infinite storage: storage has a price, we should pay for it.
Joplin-vieweb purpose is to provide an online view of my Joplin notes.
It's running on a "Django server", running beside Joplin terminal app.
Screenshot
Features and not(-yet?) features
Yes it does ❤
- Protect joplin-vieweb access by login
- Display notebooks, and notes
- images
- attachments
- code syntax highlight
- Add a table of content if note contains headers
- Display tags, and notes linked.
- Joplin sync:
- Public link if note has public tag

- Option to number (or not) header in notes:

- Tag edition: add / remove / create tags in notes:
 Once tags edited, a little reminder not to forget to synchronize Joplin:

- Checkbox list changes can be saved to notes.

- Note edition / deletion, with support of image paste, and image / attachment drag&drop.

- Note creation

- Notebook edition: create / rename / delete

- Notes history: list of the latest notes consulted, to be able to open them quickly, or pin them:

- Tabs in notes (not displayed in joplin applications). Syntax here.

- Hyperlink preview in notes, on mouse hover:

No it doesn't (yet?) 💔
- Sort notebooks nor notes
- Move note or notebook from one notebook to another.
- No specific handling for todos.
- Search for notes or tags
Installation / configuration instructions
! Only linux systems are supported
! Only arm64 and amd64 architectures
! For raspberry users (I am): use 64 bits OS
Installation
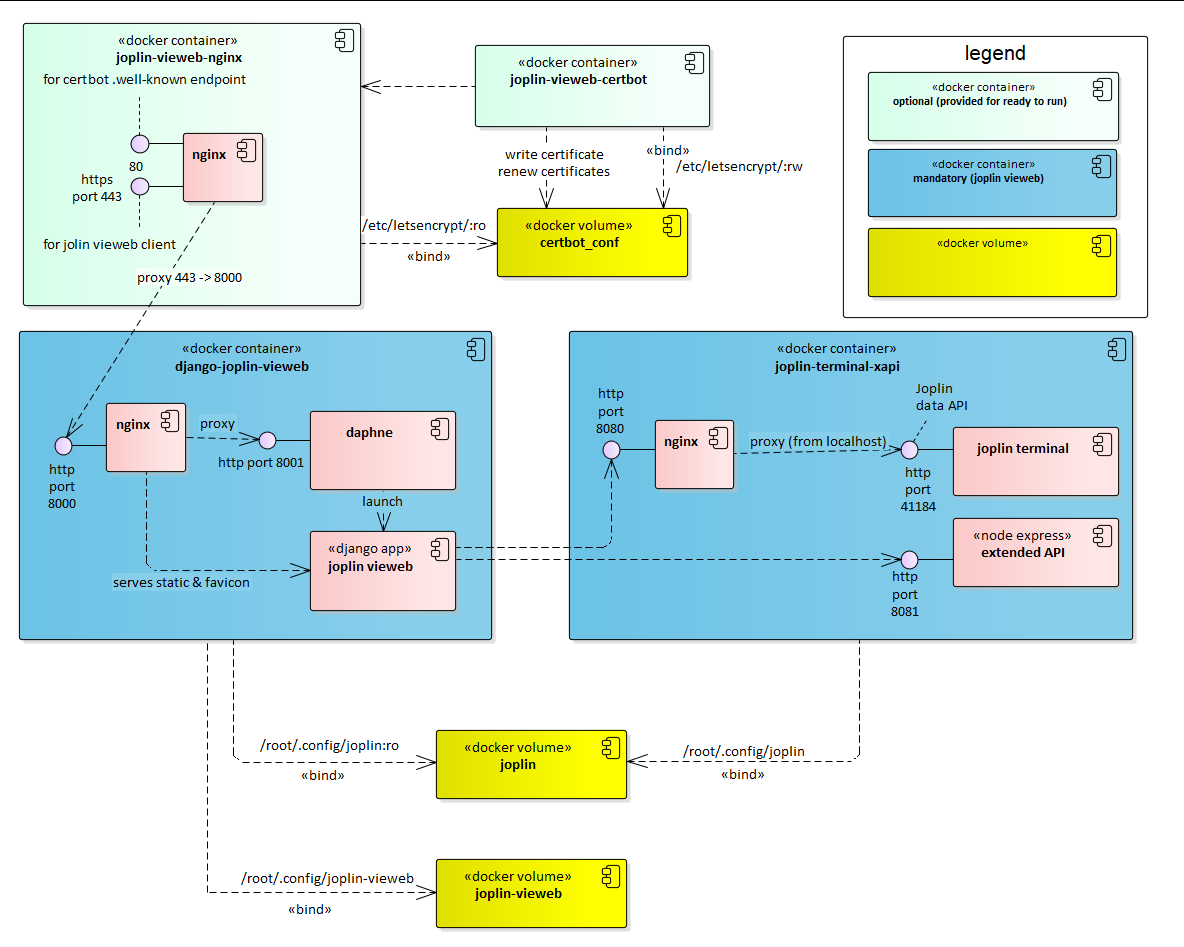
Installation is done with docker-compose. The default docker-compose file installs a nginx server with certbot certificates mechanisms, and listens to ports 80 and 443.
If you have your own server, use docker-compose-joplin-only.yml. Have a look to the containers.
- Prerequisites: your linux system has docker and docker-compose installed
- Enable docker service at system startup
- Get docker-compose.yml (either you clone this git repo, or you copy the file somewhere)
- Edit the 3 variables (x-common-variables block) at the top of docker-compose file:
- ORIGINS: write the domain and/or IP address (only those origins are allowed to access joplin-vieweb)
Exemple:
orx-common-variables: &common-variables ORIGINS: "'http://localhost:8080', 'http://192.168.21.1:8080'"x-common-variables: &common-variables ORIGINS: "'https://your_domain.com', 'https://12.34.56.78'" CERT_DOMAIN: your_domain.com CERT_MAIL: you@zaclys.net - If you use nginx and certbot containers:
- CERT_DOMAIN: your domain so let's encrypt can contact (IP address doesn't work: you need a domain)
- CERT_MAIL: a mail needed by let's encrypt.
- If you don't use nginx ans certbot container (if you use docker-compose-joplin-only.yml):
- Change <PORT-TO-YOUR-PROXY> to fit your proxy setup.
- ORIGINS: write the domain and/or IP address (only those origins are allowed to access joplin-vieweb)
- And "run"
sudo systemctl enable docker
cd ~
mkdir joplin-vieweb
cd joplin-vieweb
wget https://raw.githubusercontent.com/joplin-vieweb/joplin-vieweb/main/docker-compose.yml
vi docker-compose.yml # edit the x-common-variables (3 variables)
sudo docker-compose up
Congratulation, the server is running. If the system reboots, the server will start automatically (since we enabled docker.service at startup and the services in odcker-compose are set as "restart")
Upgrade
When a new version is available, simply go to your docker-compose file:
sudo docker-compose down
sudo docker-compose pull
sudo docker-compose up
Configuration
Users
First you must change admin password:
- login to https://your_domain.com/admin/ (login: admin / password: admin)

- Change the admin password:

- If you want to login to joplin-vieweb with another login than admin: create a user:

- Now you can logout and visit https://your_domain.com/joplin

- Login with admin or your newly created user:

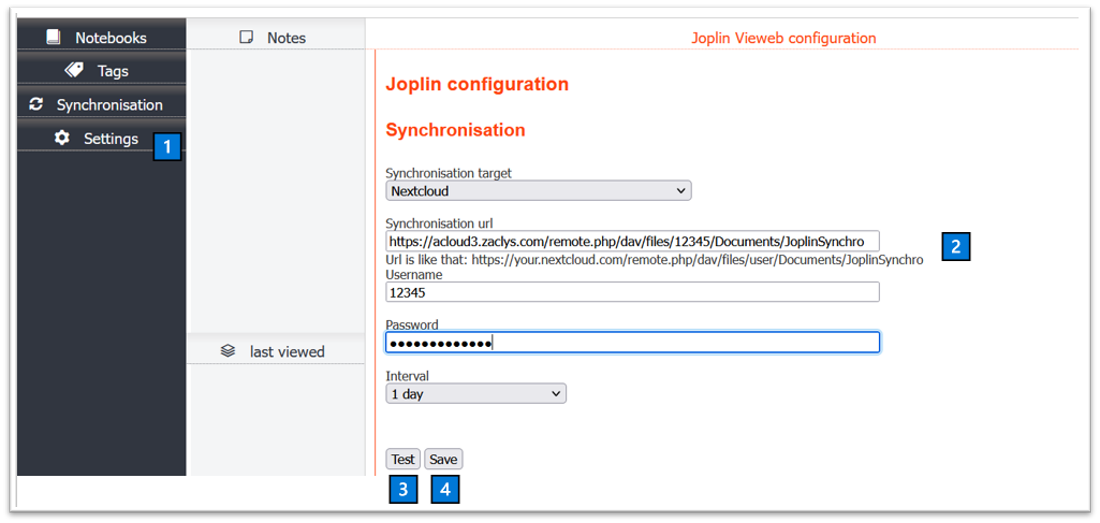
Synchronisation
You should configure a synchronisation to secure your notes:

1️⃣ Click the settings tab
2️⃣ Input synchronisation data (only next cloud is supported for now, if you would like other services, ask in a conversation)
3️⃣ Test
4️⃣ If test result is OK: save
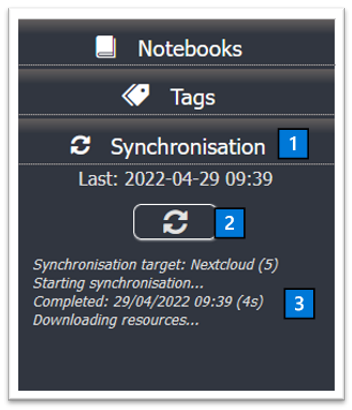
If your cloud already contains joplin content, do a synchronisation:

1️⃣ Click the synchronisation tab
2️⃣ click the sync button
3️⃣ Wait for the sync to finish (it may take a long time depending on your cloud content)


